Love this? Save it for later!
Share the inspiration with your friends
Introduction
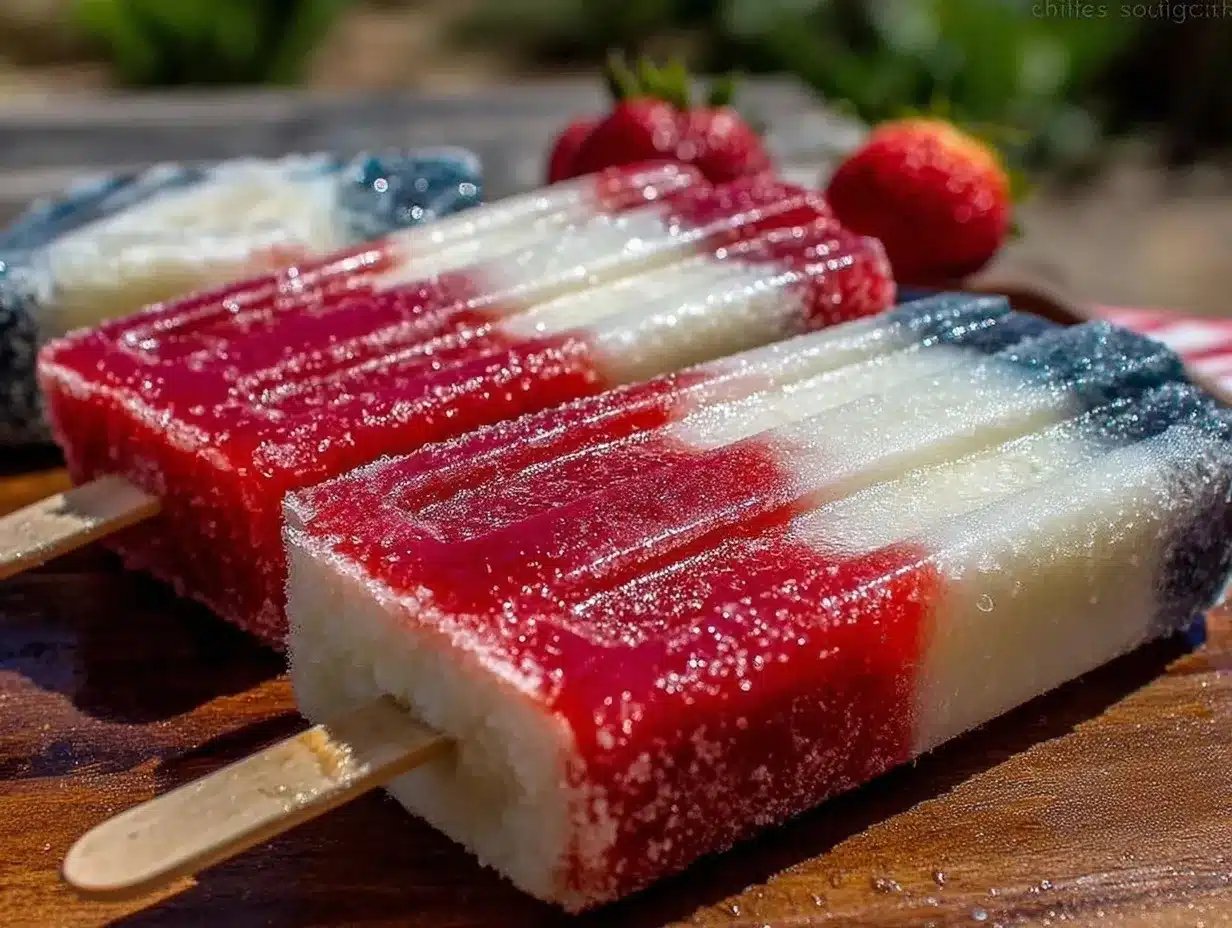
“I wasn’t expecting a popsicle recipe to become the highlight of our Fourth of July picnic,” my neighbor Linda said with a laugh last summer as she handed me one of these vibrant treats. It was a sweltering afternoon, and the kids were all buzzing around, desperate for something cool and refreshing. Honestly, the way those red, white, and blue popsicles caught everyone’s eye was half the fun—they looked like little frozen fireworks on a stick.
The recipe itself came from a chance encounter at the local farmers’ market. I overheard a vendor chatting about their secret for making perfect layered popsicles, and, well, curiosity got the better of me. I scribbled down the idea on a napkin (typical me, always forgetting where I put recipes), and after a few tries—some messy, others just right—I landed on this easy red white & blue popsicles recipe. Let me tell you, it’s become a staple whenever we want to add some festive flair without fussing over complicated desserts.
Maybe you’ve been there too—that moment when you want something colorful, fresh, and downright fun but don’t want to spend ages in the kitchen. These popsicles fit the bill perfectly. Plus, the process itself is kind of soothing, layering sweet strawberries, creamy yogurt, and tangy blueberries into a chilly treat that’s as tasty as it is patriotic. It’s a little messy (don’t ask me how many drips I wiped off the porch last time), but that’s part of the charm, isn’t it?
So stick around—I’m going to share the simple steps and tips that make these popsicles a surefire hit for your summer celebrations, whether it’s a backyard barbecue, a pool party, or just a sunny afternoon craving something cool and cheerful.
Why You’ll Love This Recipe
Honestly, making these red white & blue popsicles is a breeze and here’s why they might just become your go-to summer treat:
- Quick & Easy: You can have these frozen delights ready in about 5 steps and a few hours of chilling—perfect for last-minute party preps or spontaneous cravings.
- Simple Ingredients: No hunting for fancy stuff here. Strawberries, blueberries, and plain yogurt (or a creamy alternative) are probably already sitting in your fridge or pantry.
- Perfect for Patriotic Occasions: Whether it’s Independence Day, Memorial Day, or just a sunny weekend, these popsicles bring the festive vibe with minimal effort.
- Crowd-Pleaser: Kids and adults alike love them—there’s something charming about the colorful layers that makes everyone smile (and reach for seconds).
- Unbelievably Delicious: The combo of sweet berries and creamy yogurt layers creates a cool, tangy, and refreshing treat that’s anything but boring.
What makes this recipe stand out? It’s the layering technique that gives each popsicle its iconic red, white, and blue stripes, but without complicated molds or fancy gadgets. Plus, using Greek yogurt (I swear by Chobani for creaminess) instead of just juice or sherbet adds a silky texture and a nice tang that balances the fruit sweetness. It’s comfort food meets summer fun on a stick!
And you know, the best part is how these popsicles bring people together. I’ve watched skeptical teenagers sneak bites and then come back for more, and that’s the kind of reaction that keeps me making this recipe year after year.
What Ingredients You Will Need
This easy red white & blue popsicles recipe uses simple, wholesome ingredients to deliver bold flavor and satisfying texture without the fuss. Each component plays its role—strawberries bring the sweet red, creamy yogurt the cool white, and blueberries the vibrant blue. These are pantry staples during summer, and substitutions are pretty flexible if needed.
- For the Red Layer:
- 1 ½ cups fresh strawberries, hulled and sliced (or frozen if out of season)
- 2 tablespoons granulated sugar (optional, adjust based on sweetness)
- 1 teaspoon fresh lemon juice (brightens the flavor)
- For the White Layer:
- 1 cup plain Greek yogurt (full-fat or 2% for creaminess; Chobani is my favorite)
- 1 tablespoon honey or maple syrup (optional, for a touch of sweetness)
- For the Blue Layer:
- 1 ½ cups fresh blueberries (frozen works well too, just thawed)
- 2 tablespoons granulated sugar (optional)
- 1 teaspoon lemon juice
- Extras:
- Popsicle molds with sticks (silicone molds make popping easier)
Ingredient Tips: For the best texture, I recommend using ripe, juicy strawberries and fresh blueberries when possible. If you prefer a dairy-free option, swap the Greek yogurt for coconut yogurt or a thick plant-based alternative. When it comes to sweetness, taste your fruit first—sometimes nature’s candy is enough! I like to keep sugar optional, depending on your preference.
Equipment Needed
- Popsicle molds: Essential for shaping these fun treats. I use silicone molds because they’re flexible and make unmolding a breeze. If you don’t have molds, small paper cups and wooden sticks work too—just be patient with the peeling.
- Blender or food processor: To puree the berries smoothly for vibrant, uniform layers.
- Measuring cups and spoons: For precise ingredient amounts, especially helpful when layering.
- Mixing bowls: Separate bowls for each layer keep things neat and organized.
- Spatula or spoon: To help spread layers evenly in the molds.
If you’re on a budget, you can find affordable popsicle molds online or at local stores, and a basic blender often doubles for many kitchen tasks. I learned the hard way that a weak blender makes lumpy fruit layers, so invest in a decent one if you plan to make smoothies or purees often.
Preparation Method
- Prepare the red strawberry layer: In a blender, combine the strawberries, sugar, and lemon juice. Blend until smooth, about 30 seconds. Taste and adjust sweetness if needed. Pour a spoonful into each popsicle mold, filling about one-third of the way. Tap molds gently to remove air bubbles. Freeze for 30-40 minutes until firm but not rock solid.
- Mix the white yogurt layer: In a bowl, stir together the Greek yogurt and honey (if using). The yogurt should be thick but spreadable. Spoon the yogurt over the frozen red layer carefully to avoid mixing colors, filling up to two-thirds of the mold. Tap gently again. Freeze for another 30-40 minutes.
- Prepare the blue blueberry layer: Blend the blueberries, sugar, and lemon juice until smooth. Pour over the frozen white layer, filling the mold to the top. Insert popsicle sticks immediately. Freeze for at least 4 hours or overnight for best results.
- Unmold carefully: To release the popsicles, run warm water briefly over the outside of the molds (just a few seconds). Gently pull on the sticks to remove. If you’re using silicone molds, this step is especially easy.
- Serve and enjoy: These popsicles are best enjoyed fresh but can be stored in the freezer for up to two weeks in an airtight container or freezer bag.
Pro tip: If you notice your layers mixing too much, freeze a bit longer between steps. Patience pays off with those crisp, distinct stripes!
Cooking Tips & Techniques
When making layered popsicles, timing and texture matter a lot. Here are some tricks I’ve picked up:
- Freeze between layers: Don’t rush! Let each layer firm up to avoid colors blending into a muddy mess. About 30-40 minutes is usually perfect—check by gently touching the surface.
- Consistency is key: If your fruit purees are too thin, they’ll drip and mix. If too thick, they’re hard to pour evenly. Aim for a smooth but slightly thick texture by blending just enough and adding sugar only if needed.
- Sweetness balance: Sometimes fruit tastes different depending on season or source. Always taste your purees before layering. Adding a little lemon juice brightens flavors and balances sweetness.
- Unmolding hacks: If you don’t have silicone molds, briefly warming the mold under running water helps release the popsicles without breaking them.
- Multitasking: While waiting for layers to freeze, prep the next puree or clean up to save time.
One time, I forgot to freeze the red layer long enough, and the white yogurt sunk right through—lesson learned! Now I set a timer religiously. Remember, these little details make the difference between a pretty patriotic popsicle and a colorful mess.
Variations & Adaptations
This red white & blue popsicles recipe is a great canvas for creativity. Here are some variations I’ve tried or thought would be fun:
- Dairy-Free Version: Swap Greek yogurt with coconut yogurt or almond milk yogurt. The texture is slightly different but still creamy and delicious.
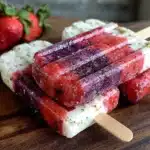
- Added Crunch: Layer in some chopped fresh strawberries or blueberries for a textural contrast. Just be careful not to overfill the molds.
- Flavor Twists: Mix fresh mint into the yogurt layer or add a splash of vanilla extract for a subtle flavor boost.
- Alcohol-Infused: For adults-only fun, add a tablespoon of vodka or rum to the fruit purees before freezing (great for summer parties, but keep it moderate to freeze properly).
- Seasonal Swaps: Replace strawberries with raspberries or watermelon for the red layer in late summer, and blueberries with blackberries for a deeper color in fall.
Personally, I once tried blending peach into the white layer with yogurt—unexpectedly good! Feel free to experiment and make it your own.
Serving & Storage Suggestions
Serve these popsicles straight from the freezer for that crisp, refreshing chill. They’re perfect for outdoor gatherings, and look fantastic when arranged on a platter with fresh berries and a sprig of mint for color contrast.
Pair them with light summer snacks like crispy garlic chicken or a fresh salad to balance the sweetness. They also complement homemade lemonade with mint beautifully for a true summer vibe.
To store, keep the popsicles in their molds or transfer to an airtight container or freezer-safe bag to prevent freezer burn. They keep well for up to two weeks. When ready to eat, let them sit at room temperature for a few minutes to soften slightly for easier biting.
Flavors tend to mellow a bit over time, so fresh is best, but they still hold their charm even after a week. Just watch out for ice crystals on the surface, which can form if they’re not stored tightly.
Nutritional Information & Benefits
Each popsicle is roughly around 70-90 calories, depending on the exact ingredients and portion size. They’re a light, refreshing treat with some nutritional perks:
- Rich in antioxidants: Strawberries and blueberries are loaded with vitamins C and K and antioxidants that help combat free radicals.
- Good protein source: Greek yogurt adds a protein boost and probiotics, great for digestion and satiety.
- Low in added sugar: You can control sweetness easily, making it a healthier alternative to store-bought popsicles loaded with syrups.
- Dairy or dairy-free options: Adaptable for various dietary needs including gluten-free and vegetarian.
From my perspective, these popsicles are a guilt-free indulgence that kids love and adults appreciate, especially when you want something light but satisfying on a hot day.
Conclusion
If you’re looking for a fun, festive, and easy summer treat, these red white & blue popsicles are a winner. They bring color, flavor, and a little bit of nostalgia to any gathering without complicated steps or ingredients. Feel free to tweak the sweetness, try your favorite fruit combos, or even sneak in some herbs for a twist—you can’t really go wrong.
I keep coming back to this recipe because it reminds me of sunny afternoons, laughter, and the simple joy of sharing something homemade. Give it a try, and let me know how your popsicles turned out—maybe you’ll discover a new favorite summer tradition too!
Don’t forget to share your creations or questions in the comments below—I love hearing your stories and ideas!
FAQs
How long do these popsicles take to freeze completely?
Typically, about 4 to 6 hours or overnight for best firmness.
Can I use frozen fruit instead of fresh?
Yes! Just thaw and drain excess liquid before blending to avoid watery layers.
What if I don’t have popsicle molds?
Small paper cups and wooden sticks work well as an alternative. Just be gentle when removing.
How can I make these popsicles sweeter without sugar?
Try adding honey, maple syrup, or agave nectar to the fruit purees or yogurt layer to taste.
Can kids help make these popsicles?
Absolutely! Layering is simple and fun, just supervise when using the blender and handling the freezer.
Pin This Recipe!

Easy Red White & Blue Popsicles
A simple and festive layered popsicle recipe featuring sweet strawberries, creamy Greek yogurt, and tangy blueberries, perfect for patriotic summer celebrations.
- Prep Time: 15 minutes
- Cook Time: 5 hours
- Total Time: 5 hours 15 minutes
- Yield: 8 popsicles 1x
- Category: Dessert
- Cuisine: American
Ingredients
- 1 ½ cups fresh strawberries, hulled and sliced (or frozen if out of season)
- 2 tablespoons granulated sugar (optional)
- 1 teaspoon fresh lemon juice
- 1 cup plain Greek yogurt (full-fat or 2%)
- 1 tablespoon honey or maple syrup (optional)
- 1 ½ cups fresh blueberries (thawed if frozen)
- 2 tablespoons granulated sugar (optional)
- 1 teaspoon lemon juice
- Popsicle molds with sticks (silicone molds recommended)
Instructions
- Prepare the red strawberry layer: In a blender, combine strawberries, sugar, and lemon juice. Blend until smooth, about 30 seconds. Taste and adjust sweetness if needed. Pour about one-third of the mixture into each popsicle mold. Tap molds gently to remove air bubbles. Freeze for 30-40 minutes until firm but not rock solid.
- Mix the white yogurt layer: In a bowl, stir together Greek yogurt and honey (if using) until thick but spreadable. Spoon the yogurt over the frozen red layer carefully to avoid mixing colors, filling up to two-thirds of the mold. Tap gently again. Freeze for another 30-40 minutes.
- Prepare the blue blueberry layer: Blend blueberries, sugar, and lemon juice until smooth. Pour over the frozen white layer, filling the mold to the top. Insert popsicle sticks immediately. Freeze for at least 4 hours or overnight for best results.
- Unmold carefully: Run warm water briefly over the outside of the molds for a few seconds. Gently pull on the sticks to remove the popsicles. Silicone molds make this step easier.
- Serve and enjoy: Best enjoyed fresh but can be stored in an airtight container or freezer bag for up to two weeks.
Notes
Freeze each layer for 30-40 minutes to prevent colors from mixing. Use ripe, juicy berries for best flavor. For dairy-free, substitute Greek yogurt with coconut or almond milk yogurt. Run warm water over molds to ease unmolding.
Nutrition
- Serving Size: 1 popsicle
- Calories: 80
- Sugar: 12
- Sodium: 30
- Fat: 1.5
- Saturated Fat: 1
- Carbohydrates: 15
- Fiber: 2
- Protein: 3
Keywords: popsicles, red white and blue, patriotic dessert, summer treat, layered popsicles, Greek yogurt popsicles, berry popsicles