Love this? Save it for later!
Share the inspiration with your friends
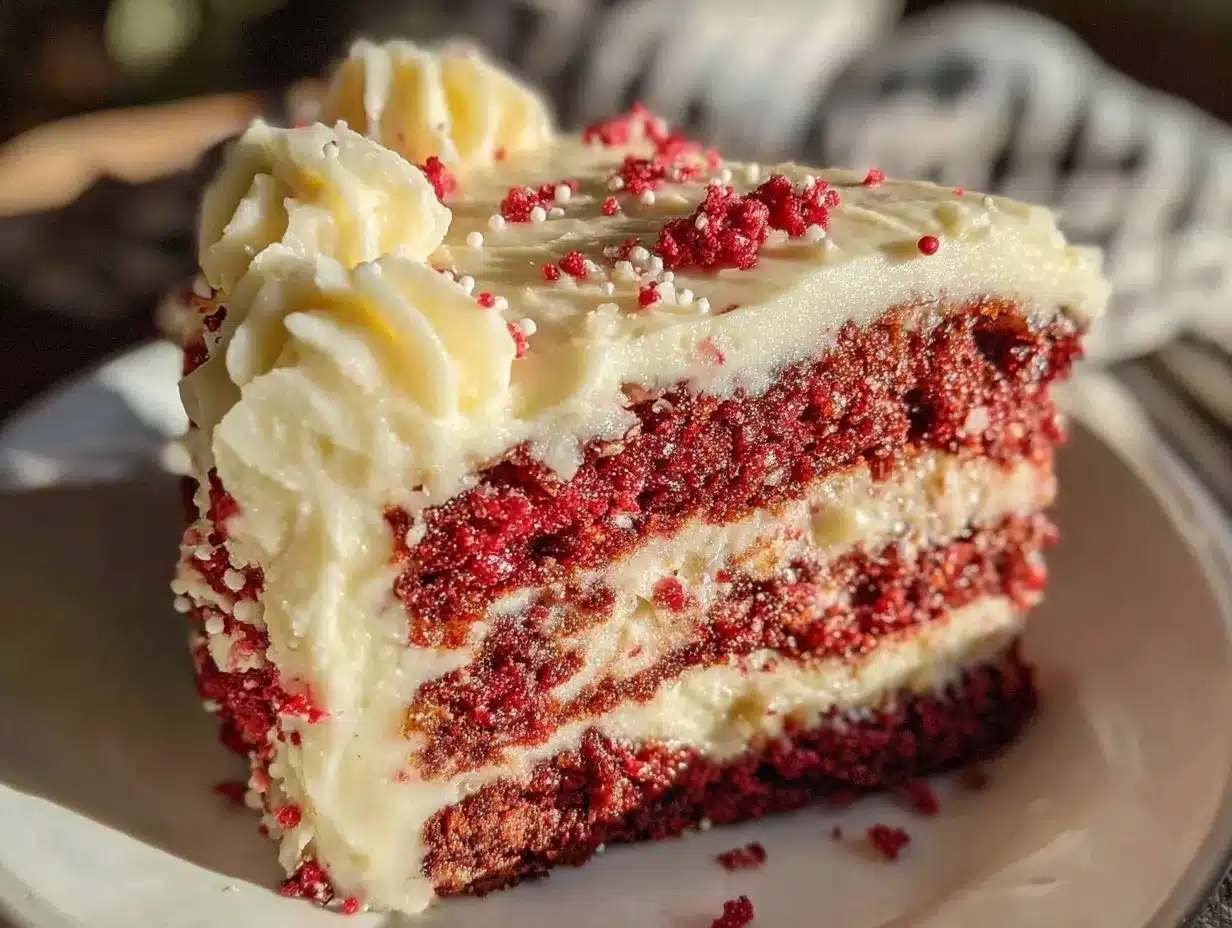
Three summers ago, I stumbled upon this red velvet flag cake recipe quite by accident. I was helping my friend Casey prepare for a 4th of July picnic, and honestly, I wasn’t expecting much from the dessert—just your typical layered cake with some patriotic flair. But then, as the slices came out and the cream cheese frosting was spread, I caught that first glimpse of the vibrant red, white, and blue layers stacked so neatly. It wasn’t just a cake; it was a showstopper.
What really got me hooked was how the flavors melted together—the subtle cocoa notes of the red velvet, the tangy cream cheese frosting, and that unexpected burst of blueberries that made it feel like a summertime celebration in every bite. I remember dropping a bowl while trying to get the layers just right (classic me), and yet the cake turned out better than any dessert I’d made before.
Maybe you’ve been there—wanting a dessert that’s festive but not fussy, impressive but approachable. This perfect red velvet flag cake with cream cheese frosting is exactly that. It’s one of those recipes that sticks with you, the kind you keep making because it brings a little sparkle to any gathering. Let me tell you, once you try it, it’s hard to go back to plain old layer cakes.
Why You’ll Love This Recipe
This perfect red velvet flag cake recipe has become a staple in my kitchen, and here’s why I think you’ll be just as smitten:
- Quick & Easy: You can have this festive cake ready in about 1 hour and 30 minutes — perfect when you need a last-minute dessert that looks like you spent hours.
- Simple Ingredients: No hunting for fancy stuff here. Basic pantry staples like cocoa powder, buttermilk, and cream cheese come together beautifully.
- Perfect for Patriotic Celebrations: Whether it’s Independence Day, Memorial Day, or just a summer BBQ, this cake’s flag design always steals the show.
- Crowd-Pleaser: I’ve served this to all sorts of guests—kids, adults, picky eaters—and it always disappears fast.
- Unbelievably Delicious: The texture is moist and tender with a silky cream cheese frosting that’s just the right balance of sweet and tangy.
What sets this apart? Well, the way the layers are arranged to mimic the American flag is fun and surprisingly easy to nail. Plus, the frosting isn’t just slathered on—it’s whipped to a fluffy dreaminess that melts in your mouth. Also, my secret weapon is using a touch of espresso powder in the batter to deepen that chocolate flavor without overpowering the signature red velvet charm.
This isn’t just another red velvet cake recipe; it’s the one I turn to when I want something that impresses without stress. Trust me, the first bite will have you closing your eyes and savoring every morsel. It’s classic comfort food with a festive twist that’s perfect for making memories.
What Ingredients You Will Need
This recipe uses simple, wholesome ingredients to deliver bold flavor and the perfect moist texture without any fuss. Most of these are kitchen staples, and if you shop seasonally, fresh blueberries add a lovely touch for the flag’s star section.
- For the Cake Batter:
- 2 ½ cups (315 g) all-purpose flour (I prefer King Arthur for consistent results)
- 1 ½ cups (300 g) granulated sugar
- 1 teaspoon baking soda
- 1 teaspoon fine salt
- 1 tablespoon unsweetened cocoa powder (look for Dutch-processed for that deep color)
- 1 ½ cups (360 ml) buttermilk, room temperature (you can make your own by adding 1 tbsp vinegar to milk)
- 1 ½ cups (340 g) unsalted butter, softened
- 2 large eggs, room temperature
- 2 tablespoons red food coloring (gel works best for intensity without thinning batter)
- 1 teaspoon pure vanilla extract
- 1 teaspoon distilled white vinegar
- 1 teaspoon espresso powder (optional, but trust me, it boosts the chocolate flavor)
- For the Cream Cheese Frosting:
- 16 ounces (450 g) cream cheese, softened (Philadelphia brand is my go-to)
- ½ cup (115 g) unsalted butter, softened
- 4 cups (480 g) powdered sugar, sifted
- 1 teaspoon pure vanilla extract
- Pinch of salt
- For the Flag Decoration:
- 1 cup fresh blueberries (or frozen, thawed and drained)
- Additional red food coloring or red sprinkles (optional, for extra pop)
Feel free to swap out all-purpose flour for a gluten-free blend if needed. For a dairy-free version, use coconut cream cheese and vegan butter substitutes. The key is to have the cream cheese and butter softened well to get that silky frosting texture.
Equipment Needed
- Three 8-inch (20 cm) round cake pans — I use non-stick pans but always line the bottoms with parchment paper for easy release.
- Electric mixer (stand or hand) — vital for whipping the frosting until it’s fluffy.
- Mixing bowls — a few medium-sized ones for batter and frosting.
- Rubber spatula — perfect for folding ingredients and scraping bowls clean.
- Cooling racks — cakes cool faster and more evenly on these, preventing sogginess.
- Offset spatula or butter knife — for smooth frosting application.
- Measuring cups and spoons — precision matters here for balanced flavor.
If you don’t have three cake pans, you can bake in batches, but keep in mind it’ll add about 20-25 minutes to your prep time. For budget-friendly options, simple non-stick pans work well, but I’ve noticed that higher-quality pans give a more even bake. A stand mixer makes the frosting silky without tiring your arm, but a hand mixer works just fine too.
Preparation Method
- Preheat your oven to 350°F (175°C). Grease the three 8-inch cake pans and line the bottoms with parchment paper — this helps the cakes come out cleanly. Set aside.
- Mix dry ingredients: In a large bowl, sift together the flour, cocoa powder, baking soda, and salt. Whisk these well to distribute everything evenly. This step ensures your cake crumb is light and even.
- Cream the butter and sugar: In another bowl, beat the softened butter and granulated sugar using an electric mixer on medium speed until the mixture is light and fluffy — about 3-4 minutes. This aerates the batter, giving the cake a tender crumb.
- Add eggs one at a time: Beat in the eggs, one by one, making sure each is fully incorporated before adding the next. Then mix in the vanilla extract.
- Combine wet and dry: Alternately add the flour mixture and buttermilk to the butter mixture, beginning and ending with the flour. Mix on low speed after each addition, just until combined. Avoid overmixing — it can make the cake dense.
- Add red food coloring and vinegar: Stir in the red food coloring, espresso powder (if using), and vinegar. The vinegar reacts with the baking soda to help the cake rise and maintain its vibrant red hue.
- Divide batter evenly: Pour the batter into the three pans as evenly as possible. Use a kitchen scale for precision if you want perfectly even layers.
- Bake: Place the pans in the oven and bake for about 25-30 minutes. To test doneness, insert a toothpick in the center—it should come out clean or with just a few crumbs attached.
- Cool: Let the cakes cool in the pans for 10 minutes, then turn them out onto wire racks to cool completely. Don’t rush this step; frosting warm cake can lead to melting and sliding layers.
- Make the cream cheese frosting: Beat the softened cream cheese and butter together until smooth and creamy, around 3-4 minutes. Gradually add the powdered sugar, beating on low speed to avoid a sugar cloud, then increase speed until fluffy. Mix in vanilla and salt. Taste and adjust sweetness if desired.
- Assemble the flag cake: Place one cake layer on your serving plate. Spread a generous layer of cream cheese frosting on top. Repeat with the second layer. For the top layer, frost the entire cake smoothly.
- Decorate: Carefully arrange blueberries in the top left corner to create the “stars” section of the flag. Use additional red food coloring or sprinkles to accentuate the stripes if you like.
- Chill and serve: Refrigerate the cake for at least 1 hour to set the frosting before slicing. This helps keep your flag design neat and your slices clean.
Pro tip: If your frosting feels too soft, pop it in the fridge for 15 minutes before frosting. Also, when frosting the layers, apply a thin crumb coat first and chill for 20 minutes to lock in crumbs for a cleaner finish.
Cooking Tips & Techniques
Making a perfect red velvet flag cake might seem tricky, but a few tricks can save you headaches:
- Don’t skip sifting: Sifting flour and cocoa powder prevents lumps and ensures the batter mixes smoothly.
- Use gel food coloring: Liquid food coloring can thin your batter and affect texture. Gel stays vibrant and thick without altering consistency.
- Softened ingredients matter: Both butter and cream cheese should feel like room temperature butter — soft enough to press with a finger but not melted.
- Measure precisely: Baking is science! I once guessed my flour amount and ended up with a brick-like cake—lesson learned the hard way.
- Layer cooling is key: Wait until your cake layers are completely cool before frosting or they’ll crumble and your frosting may melt.
- Chill your cake: Refrigerating for about an hour before slicing helps keep the layers intact and the frosting firm.
- Multitasking: While your cakes bake, whip up the frosting to save time. Just cover it tightly to prevent drying out.
Variations & Adaptations
Feel free to put your own spin on this classic red velvet flag cake:
- Berry swap: Instead of blueberries, try blackberries or raspberries for the flag’s star section. Fresh or frozen works.
- Gluten-free version: Use a 1:1 gluten-free flour blend. I’ve tested Bob’s Red Mill with great success.
- Dairy-free adaptation: Substitute cream cheese and butter with plant-based versions. Use coconut cream cheese for a slight tropical twist.
- Mini cake version: Use 6-inch pans to create personal-sized flags—perfect for picnics or gifts.
- Frosting flavors: Add a teaspoon of orange zest or swap vanilla for almond extract for a subtle flavor twist.
One time, I made a double chocolate red velvet version by adding mini chocolate chips between layers—turned out surprisingly decadent and delicious.
Serving & Storage Suggestions
This cake is best served chilled or at room temperature. The cream cheese frosting shines when cool but soft enough to melt delightfully on the tongue.
- Slice with a sharp serrated knife for clean edges.
- Pair with a tall glass of cold milk, a cup of black coffee, or even a sparkling rosé for a grown-up twist.
- Store leftovers covered tightly in the refrigerator for up to 4 days. The flavors actually deepen after a day or two.
- To freeze, wrap the whole cake or individual slices tightly in plastic wrap and foil. Thaw overnight in the fridge before serving.
- Reheat slices gently in the microwave for about 10-15 seconds if you prefer warm cake, but honestly, this one is pretty perfect cold.
Nutritional Information & Benefits
Per slice (1/12th of the cake), approximate nutrition:
| Calories | 340 kcal |
|---|---|
| Fat | 18 g |
| Carbohydrates | 42 g |
| Protein | 4 g |
| Sugar | 30 g |
The key ingredients like cream cheese provide calcium and protein, while the buttermilk adds a pleasant tang and tender crumb. This recipe isn’t low in sugar or fat, but it’s a festive treat worth savoring mindfully. For those with gluten sensitivities, the gluten-free adaptation keeps the flavor intact without compromise.
Conclusion
This perfect red velvet flag cake with cream cheese frosting truly is a recipe worth bookmarking. It strikes the balance between stunning presentation and straightforward technique, which is rare for a cake that looks so polished. I love how it brings people together, whether for a casual backyard BBQ or a special holiday gathering.
Feel free to tweak the decorations or frosting flavors to match your style—this cake welcomes your personal flair. Honestly, every time I make it, I’m reminded why I keep coming back: it tastes like celebration, comfort, and a little bit of magic all layered up.
If you try this recipe, I’d love to hear how it went! Share your photos, tweaks, or any questions you have in the comments below. Happy baking and here’s to sweet moments made even sweeter.
FAQs About Perfect Red Velvet Flag Cake
Can I make this cake ahead of time?
Absolutely! Bake the layers a day ahead and keep them wrapped tightly in plastic wrap at room temperature. Assemble and frost the day you plan to serve for the freshest look.
What if I don’t have buttermilk?
No worries—add 1 ½ tablespoons of white vinegar or lemon juice to 1 ½ cups of milk, let it sit for 5 minutes, and use as a buttermilk substitute.
How do I keep the cream cheese frosting from being too soft?
Make sure both cream cheese and butter are well chilled before beating, and refrigerate the frosting for 15-20 minutes if needed before spreading.
Can I use frozen blueberries for the decoration?
Yes, but thaw and drain them well to avoid extra moisture on the frosting, which can cause sliding or sogginess.
Is it okay to use liquid food coloring instead of gel?
Gel is preferred because it doesn’t thin the batter. If you use liquid, add less and be prepared for a slightly different texture.
For more festive cake ideas, you might enjoy my classic chocolate layer cake or the summer berry cheesecake—both perfect for celebrations with a twist.
Pin This Recipe!
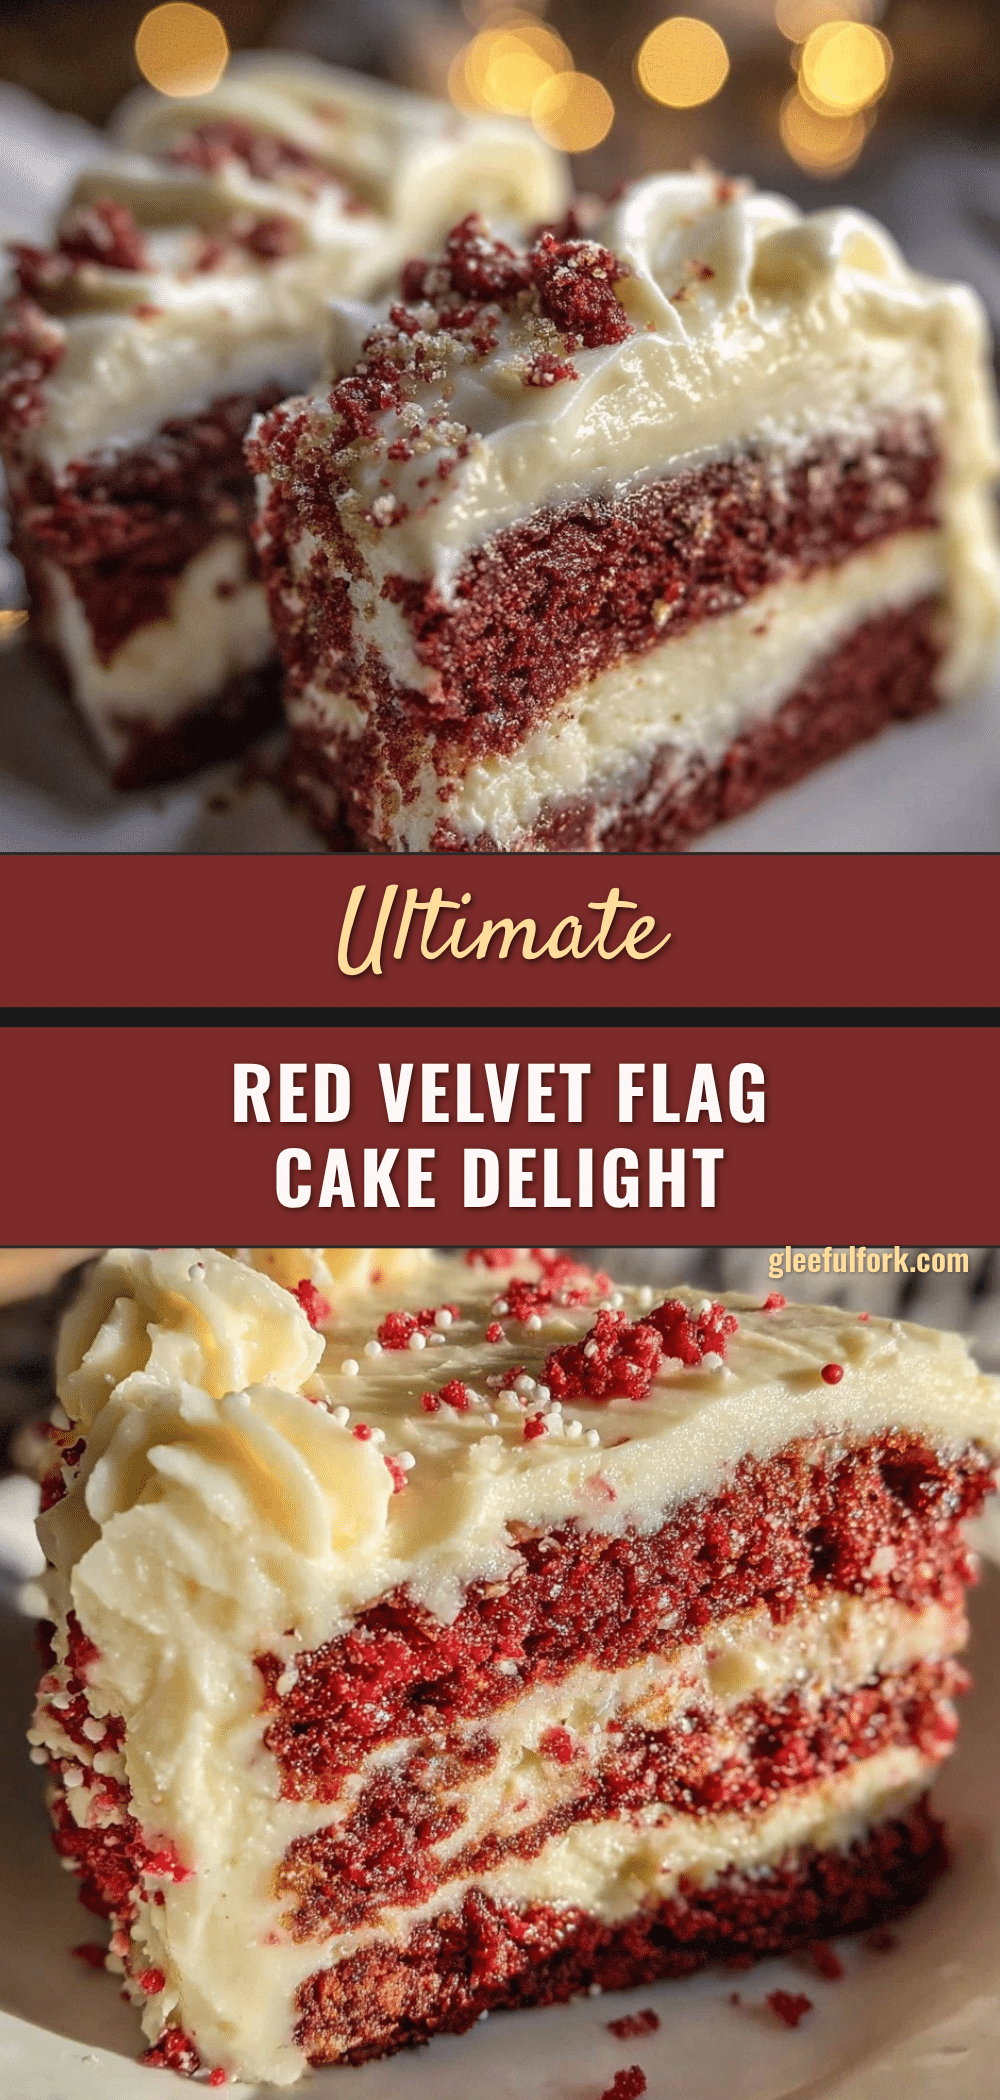
Perfect Red Velvet Flag Cake Recipe with Easy Cream Cheese Frosting

A festive and moist red velvet cake layered and decorated to resemble the American flag, topped with a silky cream cheese frosting and fresh blueberries for a patriotic celebration dessert.
- Prep Time: 30 minutes
- Cook Time: 30 minutes
- Total Time: 1 hour 30 minutes
- Yield: 12 servings 1x
- Category: Dessert
- Cuisine: American
Ingredients
- 2 ½ cups (315 g) all-purpose flour
- 1 ½ cups (300 g) granulated sugar
- 1 teaspoon baking soda
- 1 teaspoon fine salt
- 1 tablespoon unsweetened cocoa powder (Dutch-processed preferred)
- 1 ½ cups (360 ml) buttermilk, room temperature
- 1 ½ cups (340 g) unsalted butter, softened
- 2 large eggs, room temperature
- 2 tablespoons red food coloring (gel preferred)
- 1 teaspoon pure vanilla extract
- 1 teaspoon distilled white vinegar
- 1 teaspoon espresso powder (optional)
- 16 ounces (450 g) cream cheese, softened
- ½ cup (115 g) unsalted butter, softened
- 4 cups (480 g) powdered sugar, sifted
- 1 teaspoon pure vanilla extract (for frosting)
- Pinch of salt (for frosting)
- 1 cup fresh blueberries (or frozen, thawed and drained)
- Additional red food coloring or red sprinkles (optional for decoration)
Instructions
- Preheat oven to 350°F (175°C). Grease three 8-inch cake pans and line bottoms with parchment paper.
- Sift together flour, cocoa powder, baking soda, and salt in a large bowl.
- Beat softened butter and granulated sugar with an electric mixer on medium speed until light and fluffy, about 3-4 minutes.
- Add eggs one at a time, beating well after each addition, then mix in vanilla extract.
- Alternately add flour mixture and buttermilk to the butter mixture, beginning and ending with flour. Mix on low speed just until combined.
- Stir in red food coloring, espresso powder (if using), and vinegar.
- Divide batter evenly among the three pans.
- Bake for 25-30 minutes or until a toothpick inserted in the center comes out clean or with a few crumbs.
- Cool cakes in pans for 10 minutes, then turn out onto wire racks to cool completely.
- Beat cream cheese and softened butter until smooth and creamy, about 3-4 minutes.
- Gradually add powdered sugar, beating on low speed to avoid sugar cloud, then increase speed until fluffy. Mix in vanilla and salt.
- Place one cake layer on serving plate and spread a generous layer of frosting. Repeat with second layer.
- Frost the entire top layer smoothly.
- Arrange blueberries in the top left corner to create the ‘stars’ section of the flag. Use additional red food coloring or sprinkles to accentuate stripes if desired.
- Refrigerate cake for at least 1 hour to set frosting before slicing.
Notes
Use gel food coloring for vibrant color without thinning batter. Ensure butter and cream cheese are softened but not melted for best frosting texture. Chill cake before slicing for clean layers. If frosting is too soft, refrigerate for 15-20 minutes before spreading. Sift dry ingredients to avoid lumps. For gluten-free or dairy-free versions, substitute ingredients accordingly.
Nutrition
- Serving Size: 1 slice (1/12th of c
- Calories: 340
- Sugar: 30
- Fat: 18
- Carbohydrates: 42
- Protein: 4
Keywords: red velvet cake, flag cake, cream cheese frosting, patriotic dessert, 4th of July cake, layered cake, blueberry decoration