Love this? Save it for later!
Share the inspiration with your friends
Introduction
“I never thought whipped cream could be life-changing,” my friend Lisa confessed one rainy Saturday afternoon as we sat swapping stories over coffee. She’d just whipped up a batch of homemade whipped cream that was so fluffy and rich it felt like a secret indulgence. Honestly, I was skeptical—how different could it be from the canned stuff? But then she told me she’d learned the trick from an old bakery where she worked years ago, and something clicked. That day, I rolled up my sleeves in my own kitchen, armed with just heavy cream, sugar, and vanilla, and the results blew me away.
You know that feeling when you expect something simple to be just “okay,” but it turns out to be downright magical? That’s what this creamy homemade whipped cream recipe is all about. It’s easy, affordable, and honestly, a total game-changer for everything from morning fruit bowls to chocolate desserts. Maybe you’ve been there, grabbing that aerosol can in a pinch, but missing that fresh, rich flavor that only real whipped cream can bring. Let me tell you, once you try this, you’ll wonder why you ever settled for less.
Sure, I forgot to chill my mixing bowl once and ended up with a slightly runnier batch—lesson learned! But that little hiccup didn’t stop me from making this my go-to indulgence that brightens up even the simplest treats. So, if you’re ready to add a touch of creamy luxury to your day without breaking the bank or fussing over complicated steps, read on. This recipe has stuck with me because it’s just that good—and easy to make anytime.
Why You’ll Love This Recipe
After testing countless methods and adjusting every little detail, I can confidently say this creamy homemade whipped cream recipe hits the sweet spot between simplicity and decadence. Here’s why it’s become a kitchen staple:
- Quick & Easy: Whips up in under 5 minutes—perfect for last-minute dessert fixes or a quick snack upgrade.
- Simple Ingredients: Just heavy cream, sugar, and vanilla extract—nothing fancy or hard to find.
- Perfect for Any Occasion: Whether it’s topping your morning berries, a cozy hot chocolate on a chilly evening, or a birthday cake, it always fits right in.
- Crowd-Pleaser: Family and friends always ask for the recipe, even those who usually shy away from dairy.
- Unbelievably Delicious: The texture is airy yet rich, with a subtle sweetness that complements rather than overpowers.
What makes this recipe stand out is the little technique I picked up from that bakery—chilling everything beforehand and beating just until soft peaks form. It might sound basic, but that perfect balance of air and creaminess is what makes it different from the usual whipped cream you find in stores or other recipes. Plus, I’ve played around with using a touch of powdered sugar instead of granulated, which gives a smoother mouthfeel.
This isn’t just whipped cream; it’s the kind of treat that makes you pause and savor the moment. It’s comfort food’s best friend—simple, satisfying, and so easy to make. Trust me, once you make your own, you’ll never look at the spray can the same way again.
What Ingredients You Will Need
This recipe calls for straightforward, wholesome ingredients that you probably already have in your kitchen. Each one plays a key role in creating that silky, fluffy texture and subtle sweetness. Feel free to swap or tweak based on your pantry or dietary needs.
- Heavy Cream (1 cup / 240 ml): The star of the show. Choose a brand with at least 36% fat content for the best whipping results. I usually go for organic or local farm cream when I can find it, but any good-quality heavy cream works.
- Granulated Sugar (2 tablespoons / 25 g): Adds just the right amount of sweetness without weighing down the cream. For an ultra-smooth finish, powdered sugar is a great alternative (1.5 tablespoons / 20 g).
- Pure Vanilla Extract (1 teaspoon / 5 ml): Brings warmth and depth to the flavor. I recommend Nielsen-Massey for its rich, natural taste, but any pure vanilla extract will do.
- Optional: Pinch of Salt: Just a tiny pinch helps balance the sweetness and enhances the overall flavor.
Pro tip: Chilling your cream, bowl, and beaters in the fridge for at least 15 minutes before whipping helps everything come together faster and hold shape better. If you want to experiment, you can try adding a teaspoon of cream cheese for a tangy twist or swap the sugar for honey or maple syrup for a natural sweetness variation.
Equipment Needed
You don’t need anything fancy to make this whipped cream, but having the right tools can make the process smoother and more enjoyable.
- Mixing Bowl: A medium-sized metal or glass bowl works best. I usually chill mine beforehand in the fridge or freezer to help the cream whip up faster. Plastic bowls sometimes hold warmth, which slows down whipping.
- Hand Mixer or Stand Mixer: Either works great. A hand mixer is perfect if you’re whipping a small batch, while a stand mixer frees up your hands and ensures consistent speed. If you’re feeling old-school, a balloon whisk can do the job, but be ready for a workout!
- Measuring Cups and Spoons: For precise ingredient measurements.
On a tight budget? No worries. You can use a chilled metal bowl and a sturdy whisk from your kitchen drawer. Just give yourself a few extra minutes of arm exercise. I once whipped cream by hand while chatting on the phone—definitely multitasking at its finest!
Preparation Method
- Chill Everything: Place your mixing bowl and beaters or whisk attachments in the fridge for at least 15 minutes. Cold equipment helps the cream thicken quickly and hold its shape.
- Pour the Cream: Measure 1 cup (240 ml) of heavy cream and pour it into your chilled bowl.
- Add Sugar and Vanilla: Sprinkle in 2 tablespoons (25 g) of granulated sugar and 1 teaspoon (5 ml) of pure vanilla extract. Add a tiny pinch of salt if you like a balanced flavor.
- Start Whipping: Using a hand mixer on medium speed or a stand mixer on medium-low, begin whipping the cream. This usually takes about 2 to 3 minutes. Keep a close eye as it can go from soft peaks to over-whipped quickly.
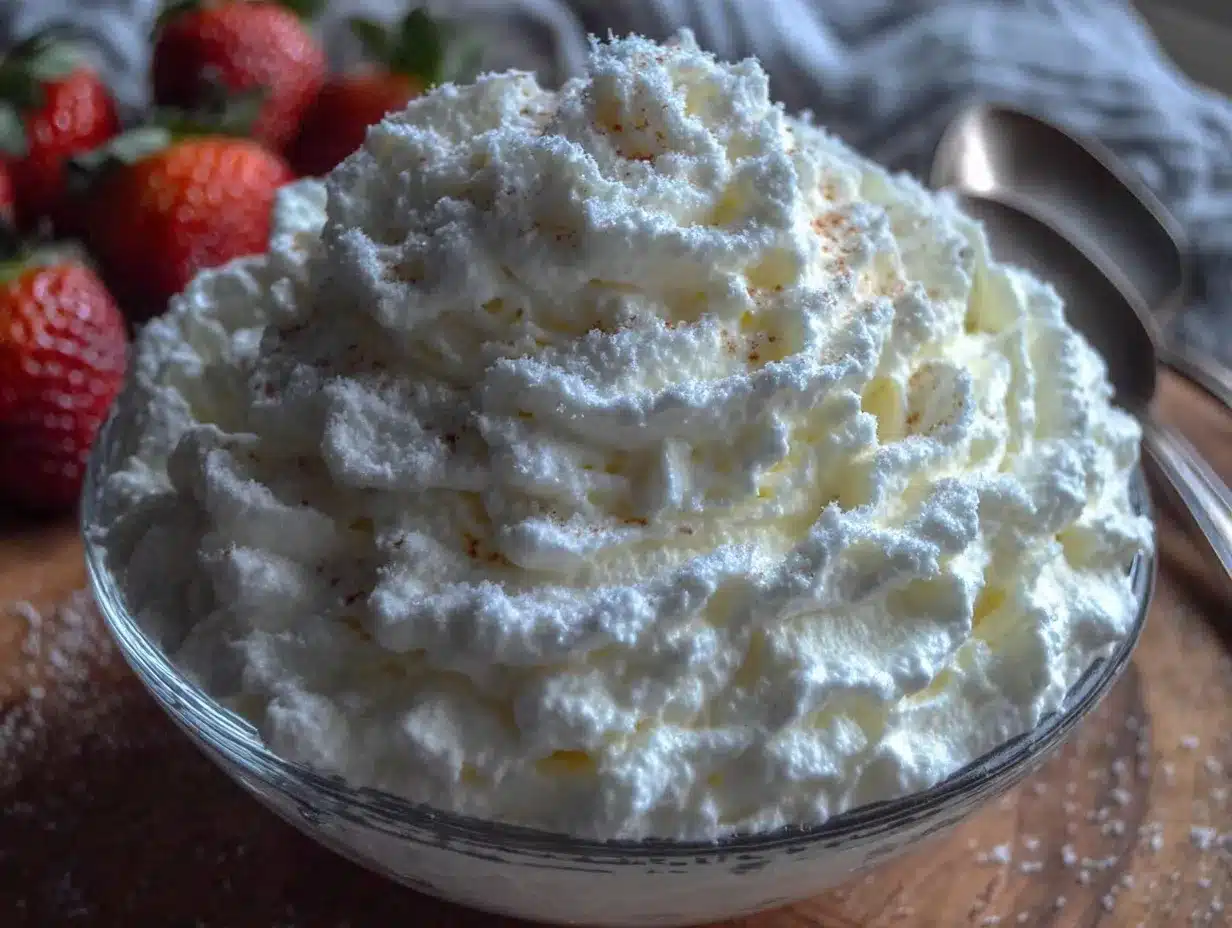
- Watch for Soft Peaks: The cream will thicken and form soft peaks that gently hold their shape but still fold over when you lift the beaters. This is when it’s perfect for spreading or dolloping.
- Check Consistency: If you prefer firmer whipped cream, continue whipping for another 30 seconds to 1 minute until you see stiff peaks that stand straight up. Be careful not to overdo it—over-whipping turns the cream grainy and eventually into butter.
- Use Immediately or Chill: Fresh whipped cream is best right away, but you can store it in an airtight container in the fridge for up to 24 hours. Give it a gentle whisk before serving if it’s been sitting.
One time, I got distracted by a phone call mid-whip and ended up with a batch that was a bit too stiff. No worries—I just folded in a splash of milk and gently re-whipped to smooth it out. These little kitchen moments happen, and honestly, they teach you how to listen to the cream’s texture more than any timer.
Cooking Tips & Techniques
Making whipped cream might seem straightforward, but a few insider tips can really lift your results.
- Chill is Key: Keep your cream and tools cold. Warm cream won’t whip well and can turn into a sad, soupy mess. I learned this the hard way one summer afternoon when my cream refused to thicken.
- Don’t Over-Whip: Stop as soon as you reach the desired peak stage. Over-whipped cream looks grainy and starts turning to butter. If you do overdo it, add a spoonful of fresh cream and gently mix to rescue it.
- Sugar Choices Matter: Powdered sugar dissolves faster and gives a smoother texture, while granulated sugar adds a slight crunch. Adjust according to your preference.
- Flavor Boosters: Try a splash of almond extract or a sprinkle of cinnamon for a twist. Just a little goes a long way.
- Beat at Medium Speed: Starting slow then moving to medium speed helps build volume without splattering cream everywhere.
Honestly, whipping cream is as much about feel as it is about timing. I often stop and check by lifting the beaters to see how the peaks hold. If you’re new to this, don’t stress—it’s one of those skills that sticks after a few tries.
Variations & Adaptations
Making whipped cream is a great blank canvas for customization and dietary adaptations. Here are some of my favorite ways to switch things up:
- Dairy-Free Version: Use chilled coconut cream instead of heavy cream. Whip it the same way for a tropical twist that’s perfect for those avoiding dairy.
- Sweetener Swaps: Replace sugar with maple syrup or honey for natural sweetness. Reduce quantity slightly to avoid a runny texture.
- Flavored Whipped Cream: Add citrus zest (lemon or orange), a dash of espresso powder, or a few drops of flavored liqueur like amaretto for grown-up indulgence.
- Low-Fat Option: While traditional whipped cream relies on fat, blending Greek yogurt with a little cream and whipping gently can create a lighter topping.
- Personal Favorite: I once mixed in a tablespoon of mascarpone cheese before whipping for a luxuriously thick and tangy cream that paired beautifully with fresh strawberries.
Feel free to experiment based on what you have on hand or dietary needs. Whipped cream is forgiving and fun that way.
Serving & Storage Suggestions
This creamy homemade whipped cream is incredibly versatile for serving. Here’s how I like to enjoy it and keep it fresh:
- Serving Temperature: Serve chilled or slightly softened at room temperature for easier spreading. If it’s been refrigerated, a quick gentle stir revives the texture.
- Presentation: Dollop generously over pies, hot chocolate, pancakes, or fresh fruit. For a festive touch, sprinkle with cocoa powder, shaved chocolate, or toasted nuts.
- Storage: Store in an airtight container in the fridge for up to 24 hours. Avoid freezing as it changes the texture and can separate upon thawing.
- Reheating: Whipped cream isn’t meant to be heated, but if used on hot desserts, add it just before serving to maintain fluffiness.
- Flavor Development: The vanilla flavor deepens after a few hours in the fridge, making leftovers even tastier.
I often make a batch early in the day for an evening dessert, and by then, it tastes even more homemade and comforting.
Nutritional Information & Benefits
Here’s an approximate nutritional profile per 2-tablespoon serving (30 g) of this whipped cream:
| Calories | 100 |
|---|---|
| Fat | 10 g |
| Saturated Fat | 6 g |
| Carbohydrates | 1 g |
| Sugars | 1 g |
| Protein | 0.5 g |
While whipped cream is indulgent, it provides a good source of fat-soluble vitamins (A, D, E) thanks to the cream. Using pure vanilla extract adds antioxidants, and by controlling the sugar amount, you can keep it on the lighter side.
This recipe is naturally gluten-free and can be adapted for dairy-free diets with coconut cream. If you’re watching calories, modest servings go a long way in adding richness without excess.
Conclusion
So, there you have it—your new favorite creamy homemade whipped cream recipe that’s easy, affordable, and downright indulgent. It’s one of those simple pleasures that makes everyday moments a little sweeter and special occasions extra memorable. I love how customizable it is, allowing you to tweak sweetness and flavors to match your mood or menu.
Honestly, once you try making your own, you might find yourself reaching for it more often than you expected. Don’t be shy about experimenting or sharing your own twists—I’d love to hear what you come up with!
Go ahead, whip up a batch today, and don’t forget to leave a comment below sharing your experience or favorite way to enjoy it. Happy whipping!
FAQs
How long can I store homemade whipped cream?
Store it in an airtight container in the fridge for up to 24 hours. It’s best used fresh but can hold its shape for a day. Give it a gentle whisk before serving if it softens.
Can I use regular cream instead of heavy cream?
Regular cream usually has less fat and won’t whip as well. For best results, use heavy cream or whipping cream with at least 36% fat content.
What’s the difference between soft peaks and stiff peaks?
Soft peaks gently fold over when you lift the beaters, while stiff peaks stand straight up. Soft peaks are great for folding into mixtures; stiff peaks hold their shape better for topping.
Can I sweeten whipped cream without sugar?
Yes! Natural sweeteners like honey, maple syrup, or agave work well but may slightly affect texture. Use sparingly to avoid making the cream too loose.
Is it possible to make whipped cream without a mixer?
Absolutely! Use a cold metal bowl and a balloon whisk, then whisk vigorously by hand. It takes more effort (about 8-10 minutes), but the result is just as delicious.
By the way, if you’re interested in other quick and delightful dessert toppings, you might enjoy my vanilla mascarpone cream or the simple easy chocolate ganache recipes.
Pin This Recipe!
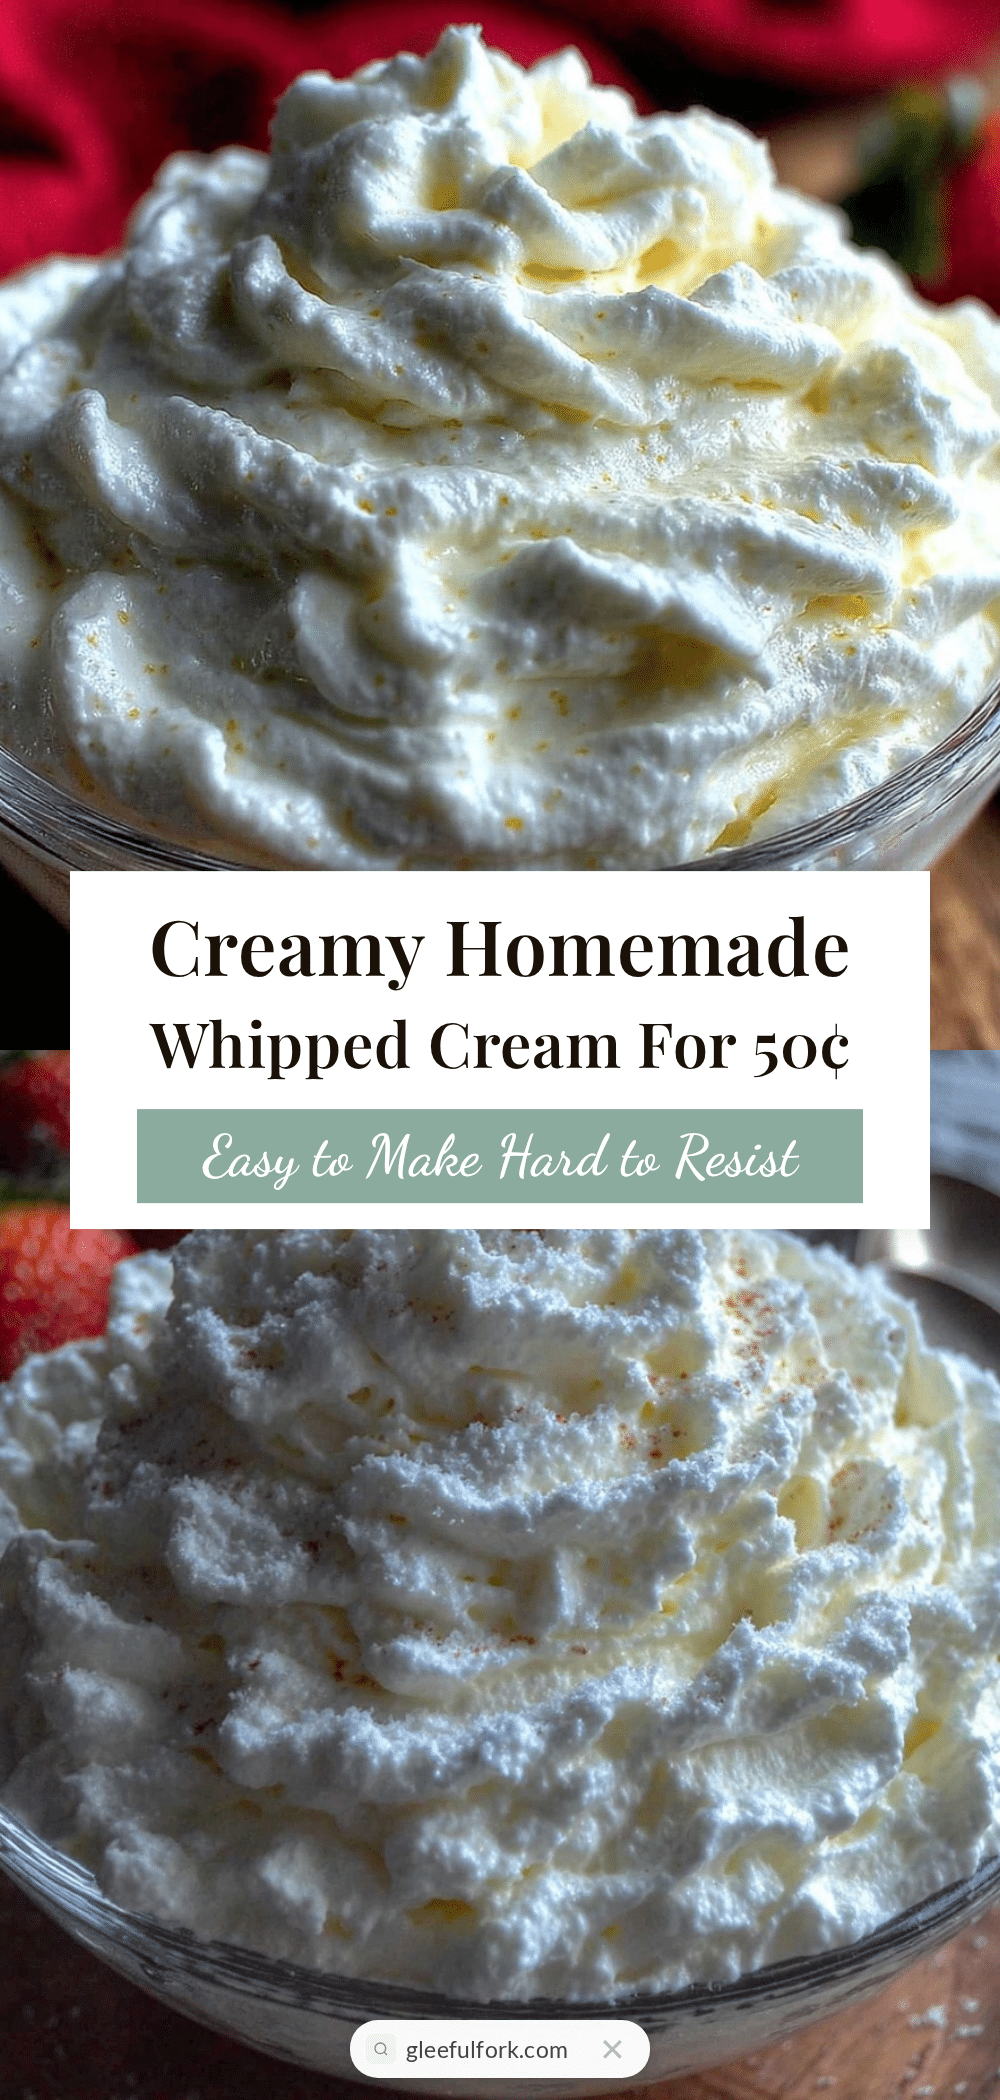
Creamy Homemade Whipped Cream Recipe for Easy Affordable Indulgence

This creamy homemade whipped cream recipe is easy, affordable, and delivers a fluffy, rich texture perfect for topping desserts, fruit, and drinks. Made with simple ingredients and a few key techniques, it transforms everyday treats into indulgent delights.
- Prep Time: 15 minutes (including chilling time)
- Cook Time: 3 minutes
- Total Time: 18 minutes
- Yield: About 1 cup whipped cream (approximately 8 servings of 2 tablespoons each) 1x
- Category: Dessert Topping
- Cuisine: American
Ingredients
- 1 cup (240 ml) heavy cream (at least 36% fat)
- 2 tablespoons (25 g) granulated sugar (or 1.5 tablespoons powdered sugar as an alternative)
- 1 teaspoon (5 ml) pure vanilla extract
- Pinch of salt (optional)
Instructions
- Chill your mixing bowl and beaters or whisk attachments in the fridge for at least 15 minutes.
- Pour 1 cup (240 ml) of heavy cream into the chilled bowl.
- Add 2 tablespoons (25 g) granulated sugar and 1 teaspoon (5 ml) pure vanilla extract. Add a pinch of salt if desired.
- Using a hand mixer on medium speed or a stand mixer on medium-low, whip the cream for about 2 to 3 minutes.
- Watch for soft peaks that gently hold their shape but fold over when you lift the beaters.
- For firmer whipped cream, continue whipping for another 30 seconds to 1 minute until stiff peaks form, being careful not to over-whip.
- Use immediately or store in an airtight container in the fridge for up to 24 hours. Whisk gently before serving if stored.
Notes
Chilling the cream, bowl, and beaters is key to achieving the best volume and texture. Avoid over-whipping to prevent turning the cream grainy or into butter. Powdered sugar can be used instead of granulated sugar for a smoother texture. Fresh whipped cream is best used immediately but can be stored up to 24 hours in the fridge.
Nutrition
- Serving Size: 2 tablespoons (30 g)
- Calories: 100
- Sugar: 1
- Fat: 10
- Saturated Fat: 6
- Carbohydrates: 1
- Protein: 0.5
Keywords: whipped cream, homemade whipped cream, easy whipped cream, dessert topping, creamy whipped cream, vanilla whipped cream, simple whipped cream