Love this? Save it for later!
Share the inspiration with your friends
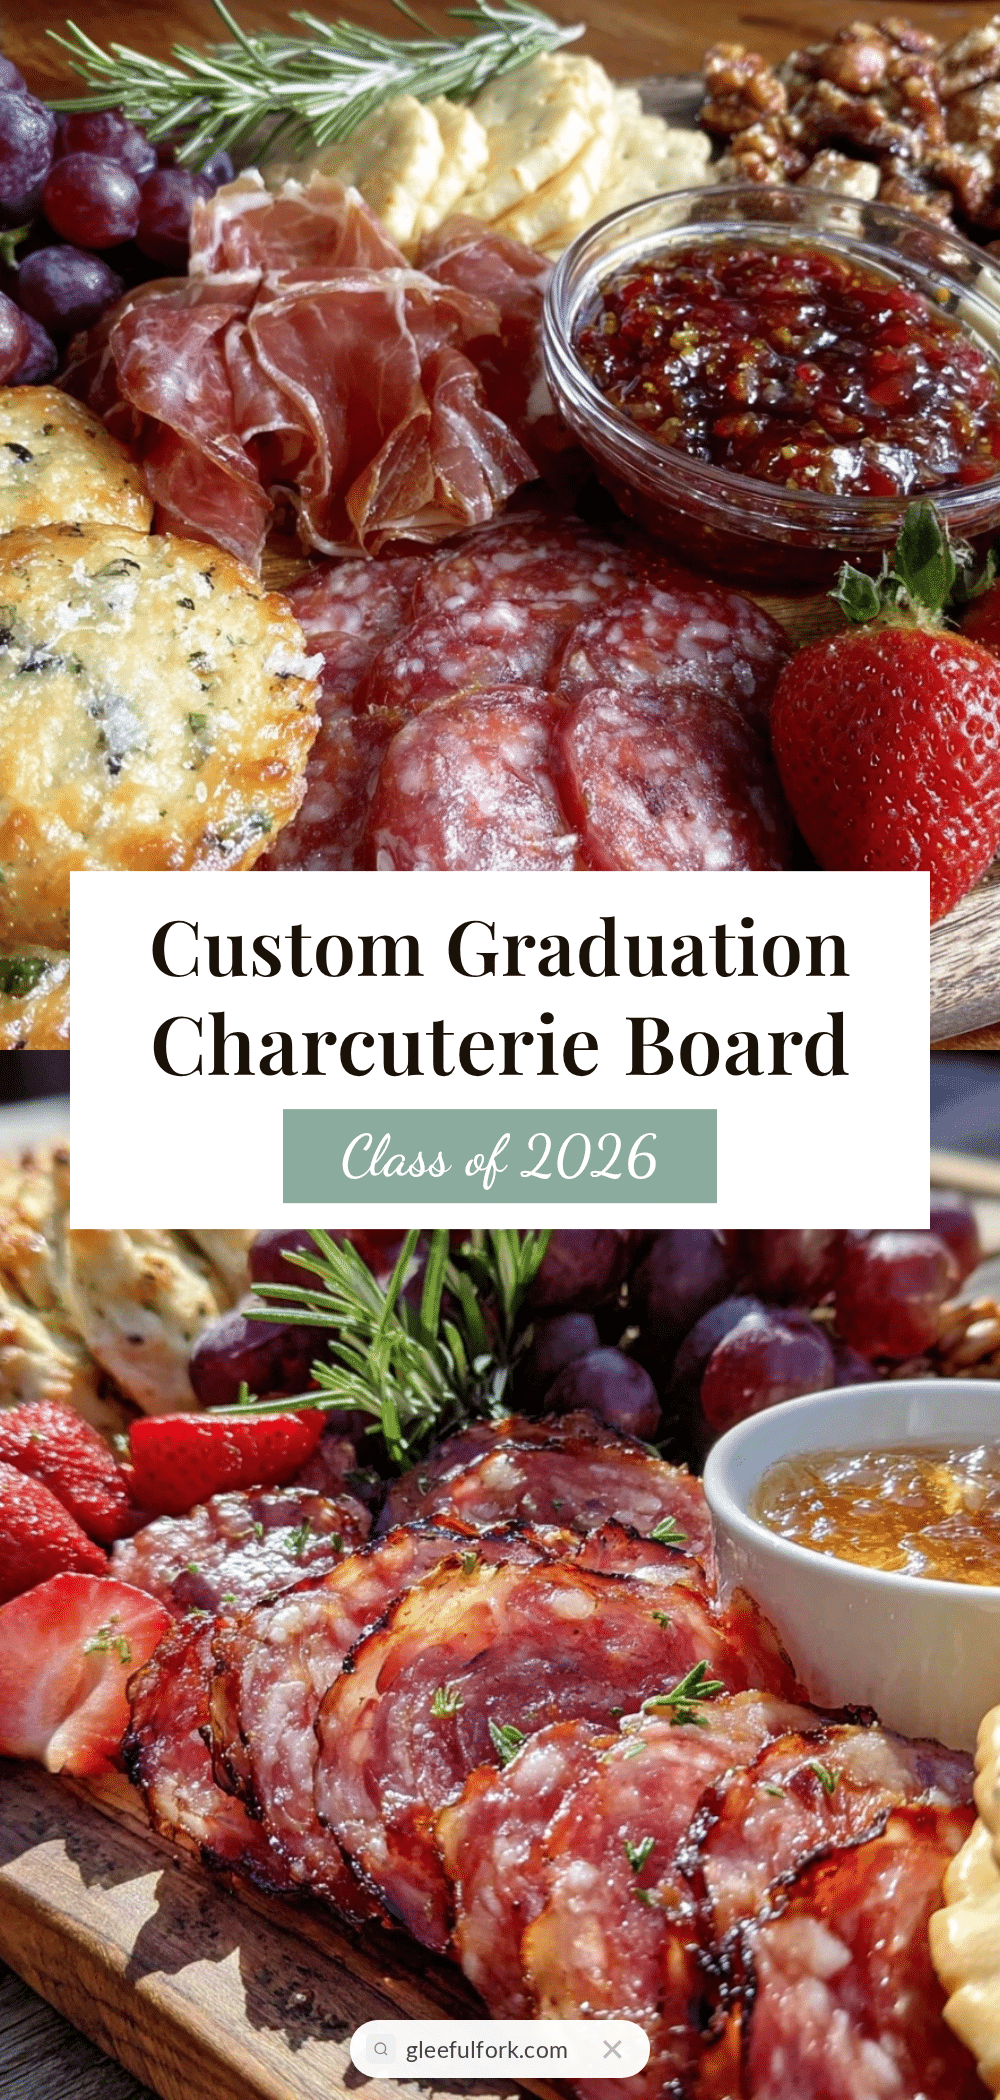
“I never thought a charcuterie board could be the highlight of a graduation party,” my friend Lisa admitted last spring. It was the day her niece was celebrating the Class of 2026, and Lisa had volunteered to bring the snacks. Honestly, she was more of a last-minute grab-some-chips-and-dip kind of person. But when she showed up with a perfectly personalised graduation charcuterie board, complete with the graduate’s school colors and favorite treats, the whole vibe of the party shifted.
It wasn’t just a snack tray—it was like a centerpiece with personality. The way the meats, cheeses, and fruits were arranged, the tiny graduation caps she’d crafted from black paper, and the little “Class of 2026” flags stuck into colorful grapes made everyone stop and admire before digging in.
That day taught me something: celebrating milestones with food that feels personal and thoughtful adds a whole new layer of joy. Maybe you’ve been there, stressing over what to serve that’s both impressive and simple. This graduation charcuterie board recipe hit the sweet spot for Lisa—and it can for you too. So, let me tell you how to put together a board that’s not just tasty but also uniquely yours for the Class of 2026 celebrations.
Why You’ll Love This Recipe
Creating the perfect personalised graduation charcuterie board isn’t just about piling snacks onto a platter—it’s about crafting an experience. After testing various combinations for countless celebrations, I can say this recipe stands out for several reasons:
- Quick & Easy: You can assemble this board in under 30 minutes, which is perfect when party planning gets hectic.
- Simple Ingredients: No need to hunt down exotic items; most ingredients are pantry staples or easy to find at local stores.
- Perfect for Graduation Parties: Whether it’s an intimate family gathering or a larger celebration, this board fits right in.
- Crowd-Pleaser: From kids to adults, everyone finds something they love—plus, the personalized touches spark conversations.
- Unbelievably Delicious: The mix of savory, sweet, crunchy, and creamy elements creates a balanced flavor profile that keeps guests coming back for more.
What sets this charcuterie board apart is the little personal details—themed decorations, school colors, and favorite snacks—that make it feel like it was made just for your graduate. I’ve included tips on how to customize your board, so it’s never the same twice. Honestly, this board has become my go-to when I want to impress without stressing, and I’m betting it will be yours too.
What Ingredients You Will Need
This graduation charcuterie board uses simple, wholesome ingredients to deliver bold flavors and satisfying textures without the fuss. Most are pantry staples, and substitutions are easy if you want to switch things up.
- For the Meats:
- Sliced prosciutto (about 4 oz / 115 g) – I prefer Fiorucci for its delicate texture
- Salami rounds (4 oz / 115 g) – Genoa salami works well
- Thinly sliced smoked turkey breast (4 oz / 115 g)
- For the Cheeses:
- Sharp cheddar, cubed (4 oz / 115 g)
- Brie wheel (6 oz / 170 g) – soft and creamy, perfect for spreading
- Manchego slices (4 oz / 115 g)
- For the Fruits & Veggies:
- Seedless green grapes (1 cup / 150 g) – adds freshness and a pop of color
- Strawberries, halved (1 cup / 150 g) – use fresh in season or frozen thawed
- Baby carrots (1 cup / 120 g)
- Cucumber slices (1 cup / 120 g)
- For the Extras:
- Mixed nuts (1/2 cup / 60 g) – almonds or cashews work great
- Olives (1/2 cup / 75 g) – Kalamata or green olives, pitted
- Honey or fig jam (2 tbsp / 30 ml) – for drizzling on cheese
- Assorted crackers (enough for 12-15 servings) – I like multigrain or water crackers
- Fresh herbs (rosemary or thyme sprigs) – optional for garnish and aroma
Personalization Tips: To reflect the graduate’s school colors, add colored candies, edible flowers, or even customized picks. If you need gluten-free options, swap crackers for rice crackers or veggie sticks. For dairy-free, consider vegan cheeses or omit cheese entirely.
Equipment Needed
- Large wooden or slate serving board: The base for your charcuterie. A 16×12 inch (40×30 cm) board works well for personal or small gatherings.
- Small bowls or ramekins: For olives, nuts, and spreads to keep them neat.
- Cocktail picks or toothpicks: To secure rolled meats or flag decoration.
- Sharp knife: For slicing cheeses and fruits precisely.
- Cheese spreader or butter knife: For soft cheese like brie.
If you don’t have a wooden board, a large ceramic platter or even a clean baking sheet lined with parchment paper will do. When using specialty boards, avoid soaking them in water—wipe clean with a damp cloth and oil occasionally to keep them looking fresh.
Preparation Method
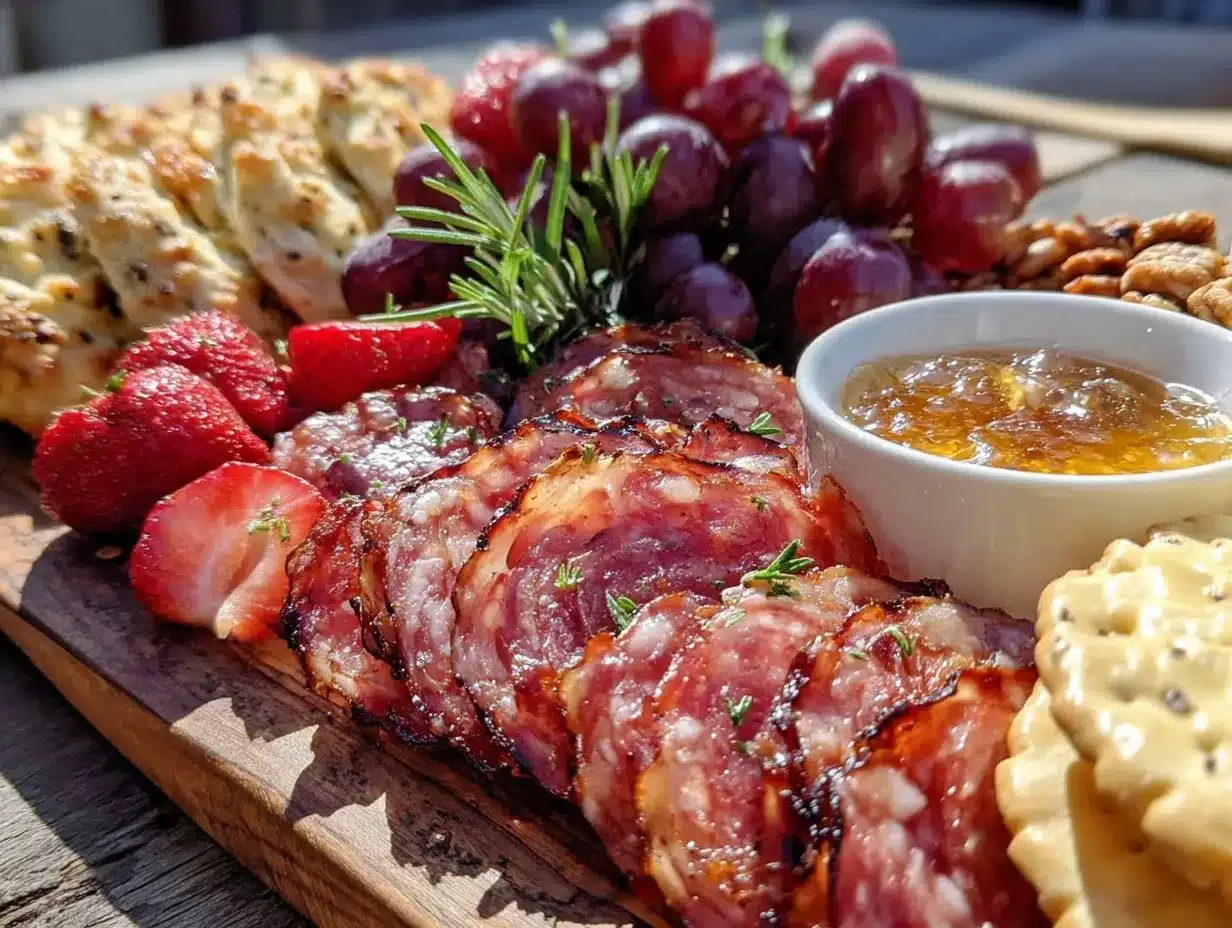
- Prepare the ingredients: Slice the cheeses into bite-sized pieces, halve the strawberries, and wash grapes thoroughly. Pat dry to avoid sogginess on the board. This should take about 10 minutes.
- Arrange the bowls: Place small bowls for olives, nuts, and honey or jam on the board first—usually at different corners to balance the layout. This anchors the composition and prevents spills.
- Roll and place the meats: Roll prosciutto and turkey slices into loose cylinders about 2 inches (5 cm) long and lay them in small clusters around the board. Fan out salami slices in a circular pattern. Rolling keeps things tidy and easy to pick.
- Add cheese pieces: Distribute cheese cubes and slices evenly, leaving space between to avoid crowding. Place the brie wheel near a bowl with a cheese spreader for easy access.
- Fill in with fruits and veggies: Nestle grapes in small bunches, arrange strawberry halves for color contrast, and tuck baby carrots and cucumber slices in gaps to add crunch and freshness.
- Scatter mixed nuts: Sprinkle nuts around the board, especially near the cheeses—they add texture and nutty flavor that complements everything.
- Place crackers: Stand crackers upright or lay them flat in groups near cheese and meats for easy grabbing.
- Finish with garnishes: Add fresh herbs and any personalized decorations like “Class of 2026” flags or colored picks. If you want, drizzle honey or jam over the brie just before serving for that sweet surprise.
- Final check: Look over the board for any empty spots or uneven balance. Fill in as needed with extra grapes or crackers. The goal is a full, inviting look without overcrowding.
Pro tip: If you prepare some components ahead (like slicing cheese or washing fruit), keep them refrigerated and assemble the board about 30 minutes before guests arrive to keep everything fresh and vibrant.
Cooking Tips & Techniques
Even though this recipe doesn’t require cooking, a few tricks can make your charcuterie board truly stand out. Here’s what I’ve learned over several celebrations:
- Balance flavors and textures: Mixing salty, sweet, creamy, and crunchy keeps guests intrigued. Don’t overload on just one type of item.
- Mind the colors: Contrast bright fruits with darker meats and pale cheeses to create visual appeal—people eat with their eyes first, you know.
- Keep soft cheeses chilled: Brie or camembert can get too soft if left out too long. Keep in the fridge until 10 minutes before serving.
- Don’t overcrowd the board: Give guests space to pick without knocking over items. It looks nicer and saves cleanup.
- Use odd numbers: Odd numbers of items (3, 5, 7) look more natural and pleasing when arranged in clusters.
Once, I accidentally forgot to put out enough crackers, and people started using carrot sticks to scoop cheese—hey, it worked and made me rethink veggies as dippers! You might find your own happy accidents here.
Multitasking tip: While you slice cheese, have another bowl ready for nuts or olives to speed up assembly. Efficiency helps when you’re running late for a party.
Variations & Adaptations
This graduation charcuterie board is flexible and easy to tweak depending on your needs or preferences:
- Dietary options: For vegetarian guests, add extra fruits, roasted chickpeas, marinated artichokes, and vegan cheese alternatives. For gluten-free, swap crackers for rice cakes or veggie sticks.
- Seasonal twists: In fall, add sliced apples, pears, or dried cranberries. Summer boards shine with fresh berries, cherry tomatoes, and basil leaves.
- Flavor profiles: Swap traditional cheeses for spicy pepper jack or smoked gouda. Try different meats like chorizo or honey ham for a new dimension.
- Cooking method adaptations: If you want warm elements, include small baked brie or mini sausage rolls alongside the cold items.
- Personalized touch: I once made a board with mini chocolate cups filled with peanut butter to surprise my graduate with a sweet treat—totally changed the game!
Serving & Storage Suggestions
Serve this charcuterie board at room temperature to let the flavors and textures shine. Remove chilled cheeses from the fridge about 15 minutes before serving to soften slightly.
Pair the board with light white wine, sparkling water with lemon slices, or even a fruity iced tea for a non-alcoholic option. For sides, fresh baguette slices or a simple green salad complement the richness well.
If you have leftovers, wrap the board tightly with plastic wrap or transfer items into airtight containers. Most individual components keep for 2-3 days in the fridge, though fresh fruits may lose crispness faster.
Reheat soft cheeses gently in the oven (about 275°F / 135°C for 10 minutes) if you want to serve warm. Crackers and nuts are best stored separately to maintain crunch.
Flavors often deepen overnight, so if you can assemble the board a few hours ahead, the savory notes will marry beautifully.
Nutritional Information & Benefits
Per serving (approximately 1/6th of the board):
| Calories | 350 kcal |
|---|---|
| Protein | 15 g |
| Fat | 25 g |
| Carbohydrates | 15 g |
| Fiber | 3 g |
The mix of nuts and cheeses provides healthy fats and protein, keeping you satisfied. Fresh fruits add fiber and antioxidants, supporting overall wellness. This board can be adapted to fit gluten-free or dairy-free diets easily by swapping components.
From a wellness perspective, serving a variety of colorful whole foods encourages mindful eating and balance—perfect for celebrating milestones without overindulgence.
Conclusion
If you want a party centerpiece that’s both stunning and delicious, the perfect personalised graduation charcuterie board for the Class of 2026 is your answer. It’s easy to put together, customizable for any taste or dietary need, and sure to impress your guests without stress.
I love this recipe because it brings people together around food that feels thoughtful and festive. Whether it’s your kid, niece, cousin, or friend graduating, making this board adds a special touch to the celebration.
Give it a try, and don’t hesitate to make it your own! Let me know your favorite combos or how you personalized your board—I’m always excited to hear new ideas. Here’s to celebrating success with style and flavor!
FAQs
What is the best cheese for a graduation charcuterie board?
Choose a mix of textures and flavors—hard cheeses like cheddar or manchego, soft cheeses like brie, and something unique like smoked gouda work well together.
How far in advance can I prepare the board?
Prep ingredients up to a day ahead but assemble the board about 30 minutes before serving to keep everything fresh.
Can I make this charcuterie board gluten-free?
Absolutely! Just swap traditional crackers for gluten-free options like rice crackers or vegetable sticks.
How do I keep the board looking fresh during the party?
Keep soft cheeses chilled until just before serving and replenish fruits or crackers as needed to maintain presentation.
What are some fun ways to personalise the board?
Add school colors with edible decorations, custom picks, or small flags. Including the graduate’s favorite snacks or a sweet treat surprise also adds a personal touch.
For inspiration on assembling snack boards, you might appreciate my guide on how to make the best charcuterie board or the easy weeknight appetizers collection for quick ideas to please any crowd.
Pin This Recipe!
Perfect Personalised Graduation Charcuterie Board Ideas for Class of 2026 Celebration

A customizable and easy-to-assemble charcuterie board perfect for graduation parties, featuring a balanced mix of meats, cheeses, fruits, and snacks with personalized decorations.
- Prep Time: 10 minutes
- Cook Time: 0 minutes
- Total Time: 30 minutes
- Yield: 12-15 servings
- Category: Appetizer
- Cuisine: American
Ingredients
- Sliced prosciutto (4 oz / 115 g)
- Salami rounds (4 oz / 115 g)
- Thinly sliced smoked turkey breast (4 oz / 115 g)
- Sharp cheddar, cubed (4 oz / 115 g)
- Brie wheel (6 oz / 170 g)
- Manchego slices (4 oz / 115 g)
- Seedless green grapes (1 cup / 150 g)
- Strawberries, halved (1 cup / 150 g)
- Baby carrots (1 cup / 120 g)
- Cucumber slices (1 cup / 120 g)
- Mixed nuts (1/2 cup / 60 g)
- Olives (1/2 cup / 75 g)
- Honey or fig jam (2 tbsp / 30 ml)
- Assorted crackers (enough for 12-15 servings)
- Fresh herbs (rosemary or thyme sprigs, optional)
Instructions
- Slice the cheeses into bite-sized pieces, halve the strawberries, and wash grapes thoroughly. Pat dry to avoid sogginess on the board.
- Place small bowls for olives, nuts, and honey or jam on the board first, usually at different corners to balance the layout.
- Roll prosciutto and turkey slices into loose cylinders about 2 inches (5 cm) long and lay them in small clusters around the board. Fan out salami slices in a circular pattern.
- Distribute cheese cubes and slices evenly, leaving space between to avoid crowding. Place the brie wheel near a bowl with a cheese spreader for easy access.
- Nestle grapes in small bunches, arrange strawberry halves for color contrast, and tuck baby carrots and cucumber slices in gaps to add crunch and freshness.
- Sprinkle mixed nuts around the board, especially near the cheeses.
- Stand crackers upright or lay them flat in groups near cheese and meats for easy grabbing.
- Add fresh herbs and any personalized decorations like “Class of 2026” flags or colored picks. Drizzle honey or jam over the brie just before serving.
- Check the board for any empty spots or uneven balance and fill in as needed with extra grapes or crackers.
Notes
Keep soft cheeses chilled until 10 minutes before serving. Assemble the board about 30 minutes before guests arrive to keep everything fresh. Use odd numbers of items for a natural look. Avoid overcrowding the board. Personalize with school colors and favorite snacks. For gluten-free, swap crackers for rice crackers or veggie sticks. For dairy-free, use vegan cheeses or omit cheese.
Nutrition
- Serving Size: Approximately 1/12 t
- Calories: 350
- Fat: 25
- Carbohydrates: 15
- Fiber: 3
- Protein: 15
Keywords: charcuterie board, graduation party, personalized snacks, easy appetizer, party food, Class of 2026, meats and cheeses, fruit platter