Love this? Save it for later!
Share the inspiration with your friends
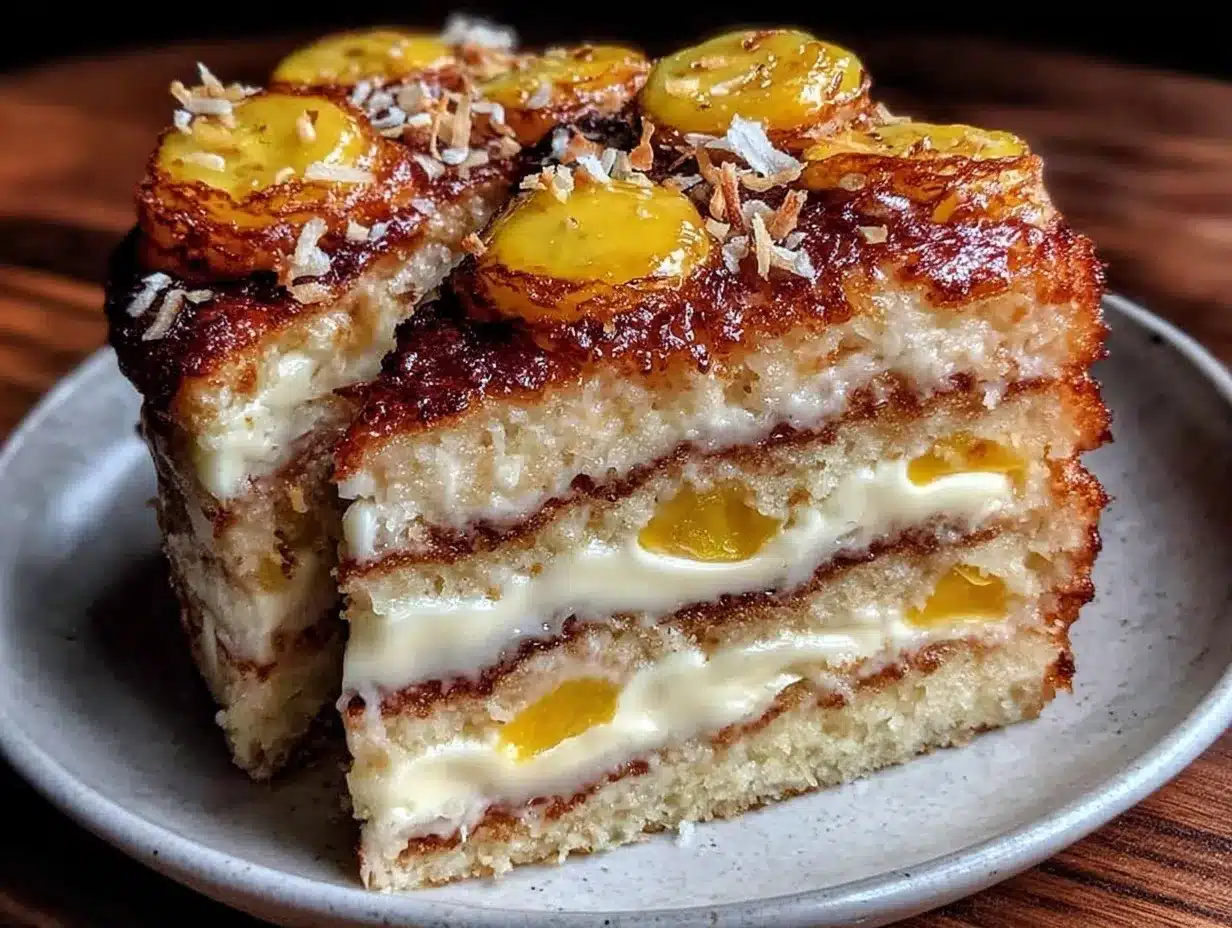
“I never thought I’d find myself baking a bibingka layered cake at midnight, but there I was, scribbling down notes in my slightly flour-dusted notebook,” my cousin Maria laughed as she recounted the night before her daughter’s graduation. You see, bibingka is one of those classic Filipino treats that always brings back memories of Christmas mornings and rainy afternoons. But this time, the challenge was different: create the perfect Filipino graduation bibingka layered cake with salted egg that would wow the entire family and mark a special milestone.
It all started when Maria spotted a vintage recipe book tucked behind a stack of dusty cookbooks at a local thrift shop last summer. The pages were yellowed, the ink smudged, but the recipe for bibingka caught her eye. She thought, “Why not turn this beloved rice cake into a show-stopping layered cake for the graduation party?” The salted egg addition, a nod to traditional Filipino flavors, was her secret weapon.
Honestly, the first attempt was a bit of a mess—the batter was too runny, and the layers didn’t quite hold. But after a few tweaks (and a kitchen covered in coconut flakes), the result was a moist, tender, and fragrant cake that tasted like a perfect hug from home. Maybe you’ve been there—trying to recreate something familiar but adding your own spin that turns out even better than you imagined. This cake isn’t just a dessert; it’s a celebration of heritage, family, and triumph.
Why You’ll Love This Recipe
From my experience baking this Filipino graduation bibingka layered cake with salted egg, it’s clear this recipe hits all the right notes for both seasoned bakers and kitchen newbies. Here’s why it’s become a staple for celebrations:
- Quick & Easy: The entire process, including layering and decorating, takes under 2 hours—perfect when you’re juggling graduation prep and party planning.
- Simple Ingredients: Using pantry staples like rice flour and coconut milk means no last-minute grocery runs. I usually pick Bob’s Red Mill rice flour for a consistent texture.
- Perfect for Special Occasions: Whether it’s a graduation, fiesta, or birthday, this cake steals the spotlight with its unique flavor and stunning layers.
- Crowd-Pleaser: Kids and adults alike rave about the subtle sweetness combined with the salty kick of the salted egg topping.
- Unbelievably Delicious: The soft, moist layers infused with coconut aroma and the slight chew of glutinous rice create a texture combo that’s simply irresistible.
What sets this recipe apart? It’s the careful balance of flavors and the layering technique that keeps each slice moist and flavorful. The salted egg topping isn’t just a garnish—it’s a flavor burst that complements the cake’s natural sweetness. I mean, this cake is the kind that makes you close your eyes after the first bite and say, “Wow, that’s home.”
What Ingredients You Will Need
This recipe uses simple, wholesome ingredients to bring out the authentic taste of bibingka with a fun layered twist. Most of these are pantry staples, with a few Filipino market finds that add that special touch.
- For the Cake Layers:
- 1 ½ cups rice flour (try Bob’s Red Mill for best texture)
- 1 cup all-purpose flour (adds structure)
- 1 ½ cups coconut milk (full fat for richness)
- 1 cup granulated sugar (adjust to taste)
- 4 large eggs, room temperature (helps with fluffiness)
- 1 tablespoon baking powder (for lift)
- ½ teaspoon salt
- 1 teaspoon vanilla extract (for aroma)
- For the Salted Egg Topping:
- 4 salted duck eggs, boiled and sliced (the star flavor)
- ½ cup grated coconut or desiccated coconut (to toast on top)
- 2 tablespoons unsalted butter, melted (to brush on top)
- Optional Garnishes:
- Fresh grated cheese (adds a salty contrast)
- Additional toasted coconut flakes (for crunch)
For a gluten-free version, swap the all-purpose flour for an equal amount of almond flour or more rice flour. If you prefer a dairy-free approach, use coconut oil instead of butter for brushing. When selecting salted eggs, look for firm yolks that are a deep orange—not pale—which means better flavor. In the summer, fresh young coconut meat is a delightful alternative to desiccated coconut for topping.
Equipment Needed
- 8-inch round cake pans (two or three pans for layering); if you don’t have multiple pans, bake layers one at a time
- Mixing bowls (preferably glass or stainless steel)
- Electric mixer or sturdy whisk (for beating eggs and sugar)
- Measuring cups and spoons (accuracy matters for this cake)
- Cooling racks (to cool cake layers evenly)
- Spatula (silicone recommended for folding batter gently)
- Basting brush (for melting butter on top)
If you don’t have cake pans, you can use a well-greased loaf pan, but the shape changes and layers might be fewer. I once used a cast iron skillet for a rustic bibingka base, but for the layered cake, pans with straight sides work best. Remember to line pans with parchment paper to prevent sticking and make cleanup easier.
Preparation Method
- Preheat your oven to 350°F (175°C). Grease and line your cake pans with parchment paper. This helps the layers come out cleanly and keeps the edges tender. (Time: 10 minutes)
- Mix dry ingredients: In a large bowl, sift together rice flour, all-purpose flour, baking powder, and salt. Set aside. This ensures even distribution and prevents lumps in your batter.
- Beat eggs and sugar: Using an electric mixer, whip the eggs and granulated sugar until pale and fluffy—about 5 minutes. You want the mixture to triple in volume for a light cake texture.
- Incorporate wet ingredients: Gently fold in the coconut milk and vanilla extract into the egg mixture. Be careful not to deflate the batter; use a spatula and fold slowly.
- Combine wet and dry: Gradually fold the sifted dry ingredients into the wet mixture. The batter should be smooth but thick enough to hold shape. If it looks too runny, add a tablespoon more rice flour.
- Divide batter: Pour the batter evenly into your prepared pans. Smooth the tops gently with a spatula. (Tip: tapping the pans lightly on the counter helps release trapped air bubbles.)
- Bake: Place pans in the oven and bake for 25-30 minutes, or until a toothpick inserted in the center comes out clean. The tops should be golden with a slight spring when pressed.
- Cool layers: Remove cakes from the oven and let them cool in the pans for 10 minutes before transferring to cooling racks. This prevents sogginess and keeps layers intact.
- Prepare salted egg topping: Boil the salted duck eggs for about 10 minutes, then peel and slice thinly. Lightly toast grated coconut in a dry pan until golden—watch closely so it doesn’t burn!
- Assemble the cake: Place the first cake layer on your serving plate. Brush melted butter lightly on top. Add a layer of sliced salted eggs and sprinkle toasted coconut evenly. Repeat with remaining layers.
- Final touches: Brush the top layer with butter, scatter more salted egg slices and toasted coconut. Optionally, add grated cheese for extra savory contrast.
- Chill: Refrigerate the assembled cake for at least 1 hour before serving. This helps the flavors meld and makes slicing easier.
Pro tip: If your first layer cracks a bit during baking, don’t fret. Just use the cracked side as the bottom layer. I’ve learned that a little imperfection only adds charm (and taste!).
Cooking Tips & Techniques
When it comes to baking the perfect bibingka layered cake, there are a few tricks I’ve picked up along the way that make all the difference.
- Rice flour handling: Rice flour can sometimes make cakes crumbly if overmixed. Always fold gently and avoid overworking the batter.
- Salted egg timing: Boil salted eggs the day before if you can. This lets you focus on the cake layers on the big day without rushing.
- Layering technique: Use a flat spatula or a bread knife to level cake layers if they dome too much. This makes stacking easier and the cake looks neater.
- Toasting coconut: Keep coconut moving in the pan to avoid burning. It should smell nutty and look golden, not dark brown.
- Multitasking: While your cake layers bake, prep your salted egg topping and toast coconut. Timing is key to keeping everything fresh and flavorful.
- Storage tip: Wrap leftover cake tightly with plastic wrap before refrigerating to keep moisture in. I’ve found this keeps the cake soft for up to 3 days.
One time, I forgot to preheat the oven (classic!), and the cake took longer to bake and was a bit denser than usual. Lesson learned: always preheat for consistent results.
Variations & Adaptations
Feel free to make this Filipino graduation bibingka layered cake with salted egg your own with these tasty variations:
- Vegan Version: Replace eggs with flax eggs (1 tablespoon ground flaxseed + 3 tablespoons water per egg) and use coconut oil instead of butter. Use a plant-based milk to replace coconut milk if preferred.
- Ube-Flavored: Add ½ cup ube halaya (purple yam jam) to the batter for a vibrant color and earthy sweetness that pairs beautifully with salted egg.
- Chocolate Twist: Mix ¼ cup cocoa powder into the dry ingredients for a chocolate bibingka layer. Top with salted egg and a drizzle of chocolate ganache for an indulgent flair.
- Gluten-Free: Omit all-purpose flour and increase rice flour by ½ cup. The texture will be chewier but still delicious.
Personally, I once tried adding a layer of macapuno (sweetened coconut strings) between the layers, and it was a big hit at the family reunion. The chewy texture and sweetness balanced the saltiness of the eggs perfectly.
Serving & Storage Suggestions
Serve this bibingka layered cake chilled or at room temperature. The flavors are more pronounced when slightly cool, and the texture is wonderfully tender.
Pair it with a cup of hot barako coffee or a refreshing calamansi iced tea for a true Filipino fiesta experience. For a party, slice into small wedges for easy sharing.
Leftovers keep well in the refrigerator for up to 3 days wrapped tightly. To reheat, bring to room temperature or warm gently in a microwave for 10-15 seconds—don’t overheat or the cake will dry out.
Flavor-wise, the cake tastes even better the next day as the salted egg and coconut meld beautifully. Just be sure to cover it well to keep it from absorbing fridge odors.
Nutritional Information & Benefits
This bibingka layered cake offers a moderate caloric profile thanks to its rice flour base and natural coconut milk fats. Each serving (about 1/10 of the cake) contains approximately:
| Calories | 280 |
|---|---|
| Carbohydrates | 40g |
| Fat | 10g |
| Protein | 5g |
| Fiber | 1.5g |
Key ingredients like coconut milk provide healthy medium-chain triglycerides (MCTs), which are good for energy. Salted eggs add protein and essential minerals. Keep in mind, the salted egg contains higher sodium, so enjoy in moderation.
If you’re managing gluten sensitivity, this recipe can be easily adapted with gluten-free flours. Overall, it’s a comforting treat with a nod to traditional Filipino flavors and some nutritious benefits.
Conclusion
Why try this perfect Filipino graduation bibingka layered cake with salted egg? Because it’s not just a cake; it’s a celebration of culture, family, and those special moments that call for something memorable. The blend of familiar flavors with a twist makes it a standout dessert that’s as meaningful as it is delicious.
Don’t be afraid to tweak the layers or toppings to suit your taste—make it yours! I still remember the first time I sliced into this cake at Maria’s party, and the smiles around the table told me this recipe was a keeper.
Give it a go, and if you’ve got your own spin on this classic, I’d love to hear about it in the comments. Sharing these recipes keeps the tradition alive and growing. Happy baking!
FAQs
Can I use regular chicken eggs instead of salted duck eggs?
Yes, but the salted duck eggs provide a unique salty flavor that’s traditional in bibingka. If using regular eggs, consider adding a pinch of salt or topping with salty cheese to mimic the flavor.
Is it possible to make this cake without coconut milk?
You can substitute with whole milk or almond milk, but coconut milk adds essential richness and authentic flavor. Using other milks may result in a less moist cake.
How do I store leftover bibingka layered cake?
Wrap the cake tightly in plastic wrap and refrigerate. It stays fresh for up to 3 days. For longer storage, you can freeze for up to 1 month.
Can I prepare the salted egg topping ahead of time?
Definitely! Boil and peel the salted eggs a day before to save time. Store them in an airtight container in the fridge until assembly.
What is the best way to slice the layered cake?
Use a sharp serrated knife and slice gently with a sawing motion to avoid squishing the layers. Chilling the cake before slicing helps maintain clean edges.
Speaking of layered cakes, if you enjoy this, you might find a delightful surprise in the moist mango sponge cake I shared earlier—another Filipino favorite that’s perfect for any celebration. And for those who love coconut flavors, the creamy coconut pandan cake offers a fragrant twist you won’t want to miss.
Pin This Recipe!
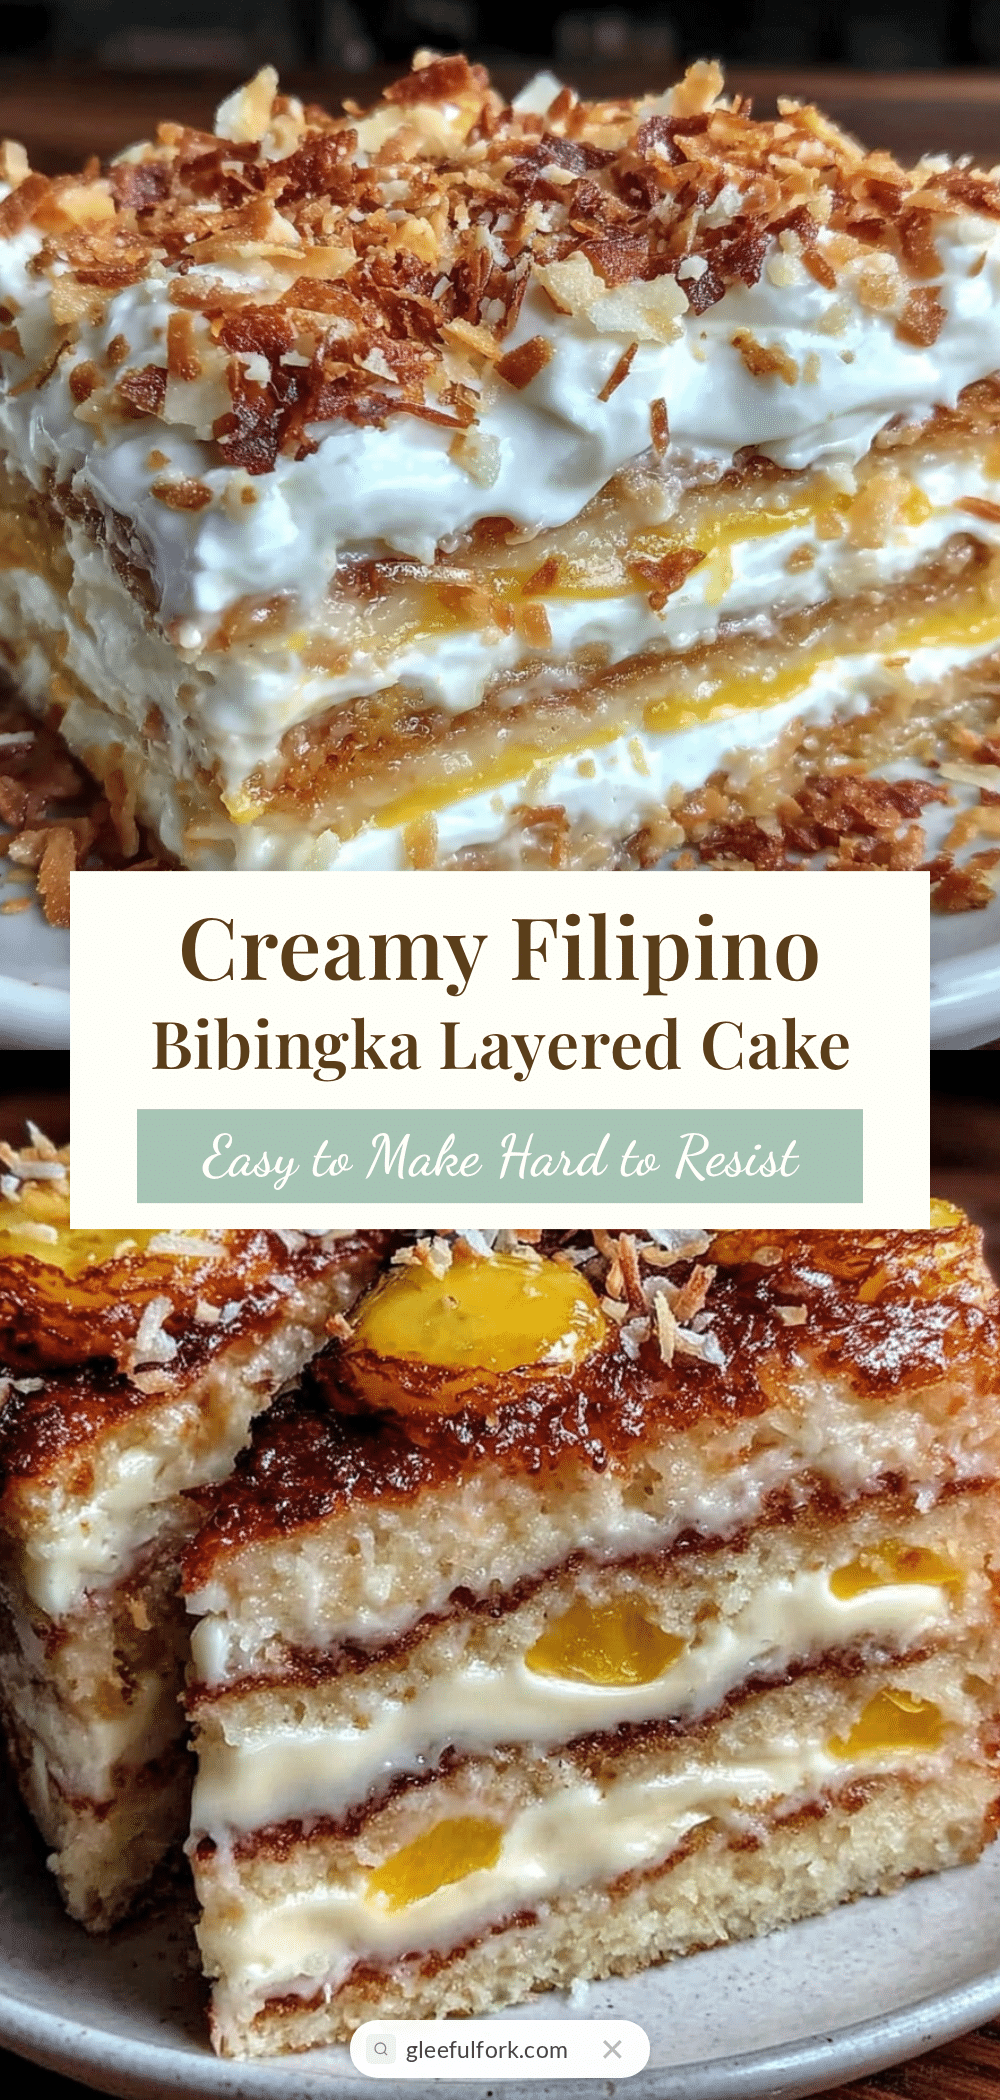
Perfect Filipino Graduation Bibingka Layered Cake Recipe with Salted Egg

A moist and tender Filipino bibingka layered cake infused with coconut milk and topped with salted duck eggs and toasted coconut, perfect for special occasions like graduations.
- Prep Time: 20 minutes
- Cook Time: 30 minutes
- Total Time: 1 hour 50 minutes
- Yield: 10 servings 1x
- Category: Dessert
- Cuisine: Filipino
Ingredients
- 1 ½ cups rice flour
- 1 cup all-purpose flour
- 1 ½ cups coconut milk (full fat)
- 1 cup granulated sugar
- 4 large eggs, room temperature
- 1 tablespoon baking powder
- ½ teaspoon salt
- 1 teaspoon vanilla extract
- 4 salted duck eggs, boiled and sliced
- ½ cup grated coconut or desiccated coconut
- 2 tablespoons unsalted butter, melted
- Optional: fresh grated cheese
- Optional: additional toasted coconut flakes
Instructions
- Preheat your oven to 350°F (175°C). Grease and line your cake pans with parchment paper.
- In a large bowl, sift together rice flour, all-purpose flour, baking powder, and salt. Set aside.
- Using an electric mixer, whip the eggs and granulated sugar until pale and fluffy, about 5 minutes.
- Gently fold in the coconut milk and vanilla extract into the egg mixture, being careful not to deflate the batter.
- Gradually fold the sifted dry ingredients into the wet mixture until smooth but thick enough to hold shape. Add more rice flour if too runny.
- Pour the batter evenly into prepared pans and smooth the tops gently. Tap pans lightly to release air bubbles.
- Bake for 25-30 minutes or until a toothpick inserted in the center comes out clean and tops are golden with slight spring.
- Remove cakes from oven and cool in pans for 10 minutes before transferring to cooling racks.
- Boil salted duck eggs for about 10 minutes, peel and slice thinly.
- Lightly toast grated coconut in a dry pan until golden, stirring constantly to avoid burning.
- Assemble the cake by placing the first layer on a serving plate, brushing melted butter on top, adding sliced salted eggs and toasted coconut. Repeat with remaining layers.
- Brush the top layer with butter, scatter more salted egg slices and toasted coconut. Optionally add grated cheese.
- Refrigerate the assembled cake for at least 1 hour before serving to meld flavors and ease slicing.
Notes
For gluten-free, substitute all-purpose flour with almond flour or more rice flour. For dairy-free, use coconut oil instead of butter. Boil salted eggs a day ahead for convenience. Use a serrated knife and chill cake before slicing for clean edges. Store leftovers wrapped tightly in refrigerator up to 3 days.
Nutrition
- Serving Size: 1 slice (1/10 of cak
- Calories: 280
- Fat: 10
- Carbohydrates: 40
- Fiber: 1.5
- Protein: 5
Keywords: bibingka, Filipino cake, layered cake, salted egg, coconut milk, graduation cake, traditional Filipino dessert