Love this? Save it for later!
Share the inspiration with your friends
Third time this week, and my oven still smells like burnt sugar and catnip. Honestly, I’m not even sure why I keep making them. The first batch was a disaster—flat, pale, and they looked less like mischievous felines and more like depressed pancakes. I scraped them into the compost bin and tried again, this time chilling the dough for a full twenty-four hours. That batch held its shape better, but the icing bled everywhere, turning the black fur into a muddy gray smudge. Now, I’m on round three, standing in front of the counter with a piping bag in one hand and a glass of wine in the other, waiting for the cookies to cool so I can try to give them eyes that don’t look completely dead.
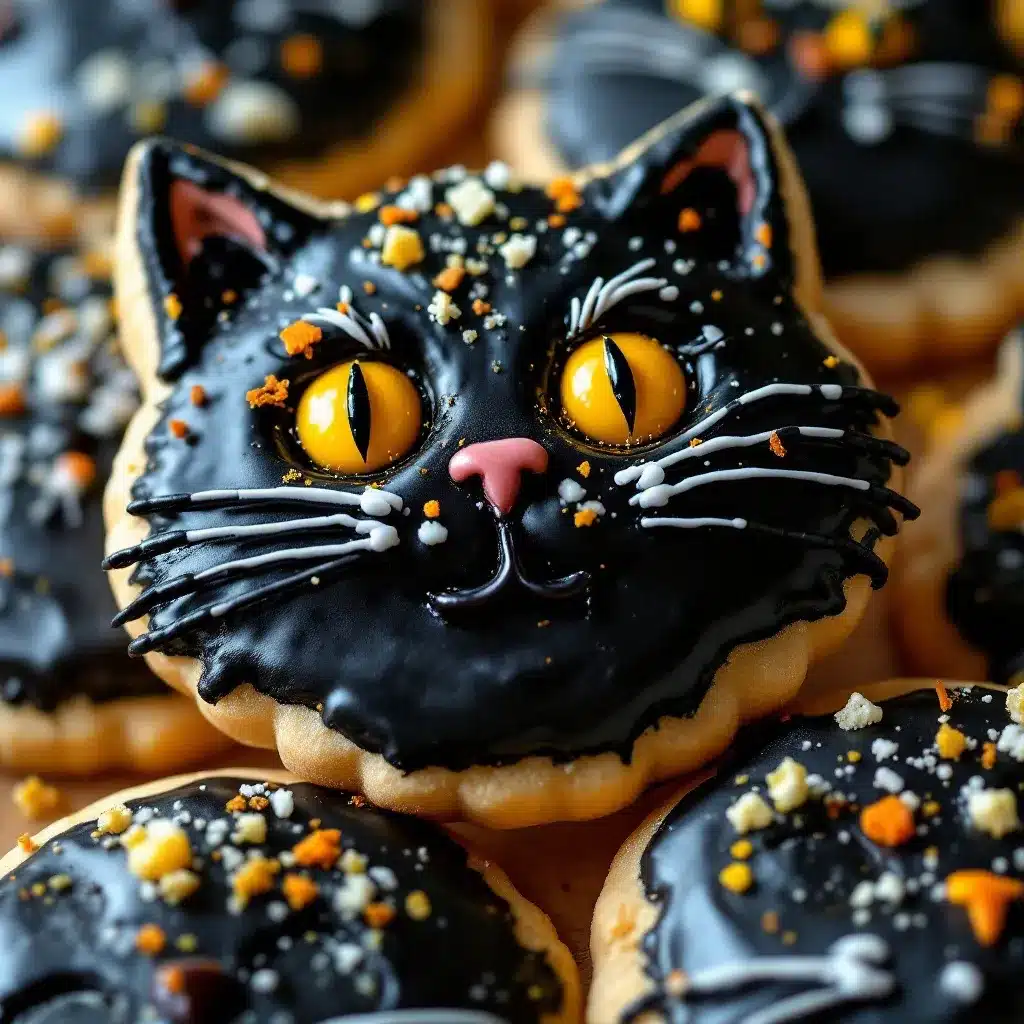
There is something compulsively satisfying about the precision required to make these perfect black cat sugar cookies. It’s not just about baking; it’s about engineering tiny, edible predators. I spent last Friday night watching a horror movie marathon while these baked, and you know what? The cookies were scarier than the film. They sit on the platter with this eerie, silent judgment, staring back at you with those bright yellow or green icing pupils. I don’t know if it’s the Halloween spirit or just my need for control, but I can’t stop. Every time I roll out the dough, I feel this strange urge to make them look as spooky and cute as possible. Maybe it’s the caffeine. Maybe it’s the stress of the upcoming holiday. Or maybe, just maybe, I’m addicted to the way the buttery, vanilla-scented dough cracks slightly at the edges while the center stays soft and chewy.
Let’s face it, baking the same cookie three times in a week is a red flag for most people, but for me, it’s just Tuesday. I watched the dough spread in the oven, held my breath, and prayed to the baking gods that the cats would stay upright. And they did. They stood tall, proud, and deliciously dark against the white parchment paper. I took a bite of the first one, and the crunch gave way to a soft, cake-like interior that melted on my tongue. It was worth the mess. It was worth the ruined icing bags. It was worth the confusion of my neighbors who saw me walking home at midnight with a bag of black cookies. I’ll probably make them again tomorrow. I just need to buy more black food coloring.
Why You’ll Love This Recipe
Let’s be real for a second. Halloween treats are usually either too sugary, too artificial, or just plain boring. But these perfect black cat sugar cookies? They hit that sweet spot between spooky and sophisticated. I’ve tested dozens of sugar cookie recipes over the years—from the classic rolled variety to the trendy cream cheese versions—but this one is the gold standard. It’s the kind of recipe that makes you close your eyes after the first bite and actually hear an angel sing. It’s comfort food reimagined for the spookiest night of the year, with the same soul-soothing satisfaction as your grandma’s pie, but with a mischievous twist.
- Quick & Easy: Yes, chilling takes time, but active prep is under 30 minutes. Perfect for busy weeknights when you need a last-minute party centerpiece.
- Simple Ingredients: No fancy grocery trips needed. You likely already have flour, butter, sugar, and eggs in your kitchen. The black food coloring is the only special item, and it’s cheap.
- Perfect for Halloween: Whether it’s a trick-or-treat exchange, a school party, or a cozy night in, these cookies fit the theme perfectly without being cheesy.
- Crowd-Pleaser: Kids love the cute cat faces, and adults love the high-quality buttery flavor. It’s a win-win that always gets rave reviews.
- Unbelievably Delicious: The texture is next-level. Crisp edges, soft center, and a melt-in-your-mouth finish that beats store-bought alternatives every time.
What makes this recipe different from the rest is the balance. Most sugar cookies are either too hard (like rocks) or too cakey (like muffins). This recipe uses a specific ratio of wet to dry ingredients to create a dough that holds intricate details—like tiny whiskers and pointed ears—without losing its structure. It’s not just another version; it’s your best version. I’ve spent years tweaking the butter temperature and the chilling time to get this exact consistency. It’s the kind of recipe that makes you feel like a professional baker, even if you’re just starting out. Plus, it’s perfect for impressing guests without the stress of complex techniques. You just roll, cut, bake, and decorate. Simple, effective, and delicious.
What Ingredients You Will Need
This recipe uses simple, wholesome ingredients to deliver bold flavor and satisfying texture without the fuss. The magic lies in the quality of your basics. You don’t need expensive imported flours or exotic spices. What you need is precision. I recommend using unsalted butter so you can control the salt level, and high-quality vanilla extract because you can taste it in every bite. The black food coloring is crucial here, so don’t cheap out. Gel food coloring is your best friend because it provides intense color without adding extra liquid, which can ruin the dough’s consistency.
For the Dough
- All-purpose flour: 2 1/2 cups (315g). Sifted to remove lumps. I use Gold Medal for consistent results.
- Unsalted butter: 1 cup (226g), softened to room temperature. This is key for creaming properly.
- Granulated sugar: 1 cup (200g). Regular white sugar gives that slight crisp edge.
- Brown sugar: 1/2 cup (100g), packed. Adds moisture and a hint of caramel flavor.
- Egg: 1 large egg, room temperature. Helps bind the dough.
- Vanilla extract: 2 teaspoons. Pure vanilla, not imitation. It makes a huge difference.
- Baking powder: 1 teaspoon. Gives a little lift without making them cakey.
- Salt: 1/2 teaspoon. Balances the sweetness.
For the Black Cat Decoration
- Black gel food coloring: A generous amount. I recommend Americolor Super Black for the deepest shade.
- White icing or royal icing: For the eyes and whiskers. You can make this from scratch or use a tube.
- Yellow or green gel food coloring: To tint the white icing for the pupils.
- Black sprinkles or edible markers: Optional, for adding extra detail like nose shapes.
If you’re allergic to eggs, you can substitute with a flax egg (1 tbsp ground flaxseed mixed with 3 tbsp water), though the texture might be slightly denser. For a gluten-free option, use a 1:1 gluten-free flour blend, but be careful not to overmix, as GF flour can absorb liquid differently. In summer, you might need to chill the dough longer due to the heat, so keep that in mind. The key is to keep everything cold until it hits the oven.
Equipment Needed
You don’t need a lot of fancy gear to make these perfect black cat sugar cookies, but having the right tools makes the decorating process so much less stressful. First and foremost, you need a good set of cookie cutters. I recommend a specific cat-shaped cutter, but if you can’t find one, you can use a circle cutter and a small triangle cutter to assemble the ears yourself. It takes more time, but it’s a fun activity for kids. A large baking sheet is essential; I use half-sheet pans because they hold more cookies and bake more evenly. Line them with parchment paper or silicone baking mats. Parchment paper is my go-to because it prevents sticking and makes cleanup a breeze. A stand mixer or a hand mixer is helpful for creaming the butter and sugar, but you can do it by hand if you have strong arms. A small offset spatula is useful for spreading icing, and fine-tip piping bags or ziplock bags with the corner snipped off are perfect for drawing delicate whiskers. I also keep a small bowl of ice water nearby to fix any icing mistakes quickly.
Preparation Method
Start by preheating your oven to 350°F (175°C). Line two large baking sheets with parchment paper and set them aside. This is step zero, and skipping it leads to burnt cookies. Trust me on this. Next, in a medium bowl, whisk together the flour, baking powder, and salt. Set this aside. It’s easy to forget the leavening agent, so give it a good mix now to ensure even distribution.
In a large mixing bowl, cream together the softened butter, granulated sugar, and brown sugar. If you’re using a stand mixer, use the paddle attachment on medium speed for about 3-4 minutes until the mixture is light and fluffy. This step is crucial for the texture. If the butter is too cold, the sugar won’t incorporate properly, and your cookies will be dense. If it’s too warm, they’ll spread too much. You want it to look like wet sand. Add the egg and vanilla extract, and mix until just combined. Be careful not to overmix here. Scrape down the sides of the bowl with a spatula to ensure everything is incorporated.
Gradually add the dry ingredients to the wet mixture. Mix on low speed until a dough forms. It should come together in a ball. If it’s too crumbly, add a teaspoon of milk. If it’s too sticky, add a sprinkle of flour. Turn the dough out onto a lightly floured surface and divide it in half. Flatten each half into a disc, wrap tightly in plastic wrap, and chill in the refrigerator for at least 2 hours, or up to 24 hours. Chilling is non-negotiable. It firms up the butter, which prevents the cookies from spreading into puddles. It also allows the flavors to meld, resulting in a deeper, more complex taste.
When you’re ready to bake, take one disc of dough out of the fridge. Let it sit for 5 minutes to soften slightly so it’s easier to roll. On a floured surface, roll the dough out to about 1/4 inch thickness. Use your cat cutter to cut out shapes. Place them on the prepared baking sheets, leaving about 2 inches between each cookie. Gather the scraps, re-roll, and cut more shapes. You’ll get about 24 cookies from this batch. Bake for 10-12 minutes, or until the edges are just barely golden. They should still look soft in the center. They will firm up as they cool. Let them cool on the baking sheet for 5 minutes, then transfer to a wire rack to cool completely. This is important. If you try to ice them while they’re warm, the icing will melt and slide off.
Once completely cool, it’s time to decorate. Mix your black gel food coloring into a small portion of your icing to create the cat’s body. Use a piping bag to fill in the cat shape. For the eyes, mix a small amount of yellow or green coloring into white icing. Use a toothpick or a fine tip to dot the eyes onto the black cats. Add whiskers with white icing. It’s okay if it’s not perfect. Imperfections add character. Let the icing dry completely before serving. This can take a few hours, so plan ahead.
Cooking Tips & Techniques
One of the biggest mistakes people make with sugar cookies is overworking the dough. Once you add the flour, mix it just until it comes together. Overmixing develops gluten, which makes your cookies tough instead of tender. I learned this the hard way during my second batch last week. They came out hard as rocks. I had to scrape them into the trash. Lesson learned. Also, make sure your butter is at the right temperature. It should be soft enough to leave an indent when you press it, but not so soft that it’s greasy. If it’s too warm, your cookies will spread. If it’s too cold, they won’t bake evenly.
When rolling out the dough, use enough flour to prevent sticking, but not so much that it dries out the edges. Too much flour can make the cookies taste dry. I like to use a rolling pin with thickness guides to ensure uniform size. This helps them bake evenly. If you’re having trouble with the icing bleeding, make sure your dough is completely cool. Warm cookies will melt the icing. Also, don’t make the icing too runny. It should be thick enough to hold its shape but fluid enough to pipe. If it’s too thick, add a drop of water. If it’s too thin, add more powdered sugar.
Another tip is to bake one sheet at a time. If you put two sheets in the oven, the cookies might bake unevenly. Rotate the pan halfway through baking if your oven has hot spots. This ensures even browning. I also recommend using gel food coloring rather than liquid. Liquid coloring adds water to the icing, which can cause it to crack or run. Gel coloring is concentrated and doesn’t alter the consistency. It’s worth the extra cost for the professional look. Finally, be patient. Letting the cookies cool completely before decorating is the key to success. Rushing this step will lead to a messy, messy outcome.
Variations & Adaptations
While the classic black cat is the star of the show, there are plenty of ways to tweak this recipe. For a festive twist, try using orange food coloring for the cats’ bodies and black icing for the details. It’s a fun variation that still fits the Halloween theme. If you want to make them gluten-free, swap the all-purpose flour for a high-quality 1:1 gluten-free blend. Just be sure to add a pinch of xanthan gum if your blend doesn’t already have it. For a dairy-free option, use vegan butter and a flax egg. The texture might be slightly different, but they’ll still be delicious.
You can also change the flavor profile. Add a teaspoon of lemon zest to the dough for a citrusy kick. Or, mix in some crushed peppermint candies for a holiday twist. If you’re not a fan of black, try purple or green food coloring. It’s all about personal preference. I once made them with red food coloring for Valentine’s Day, and they looked like little red devils. It was a hit. Don’t be afraid to experiment. The base recipe is forgiving and adaptable. Just remember to adjust the chilling time if you add wet ingredients like zest or extracts. The dough needs to be firm to hold its shape.
Serving & Storage Suggestions
These perfect black cat sugar cookies are best served at room temperature. They have a delightful crunch on the outside and a soft, chewy center. Pair them with a glass of cold milk or a cup of hot tea for a cozy afternoon treat. They also make a great addition to a Halloween party spread. Arrange them on a tiered stand with other spooky treats for a visually stunning display. If you’re serving them to kids, let them help with the decorating. It’s a fun activity that keeps them entertained.
For storage, keep the cookies in an airtight container at room temperature for up to 5 days. Place a slice of bread in the container to keep them soft. If you want to freeze them, bake them first and let them cool completely. Then, freeze them in a single layer on a baking sheet before transferring to a freezer-safe container. They’ll last for up to 3 months. Thaw them at room temperature before decorating. If you decorate them before freezing, the icing might crack. It’s best to decorate them fresh. The flavors develop over time, so they often taste better on the second or third day.
Nutritional Information & Benefits
While these cookies are definitely a treat, they’re not entirely devoid of nutritional value. Butter provides fat-soluble vitamins like A and D. Eggs are a good source of protein and choline, which is important for brain health. Flour provides carbohydrates for energy. However, these cookies are high in sugar and calories, so enjoy them in moderation. One cookie contains approximately 150 calories, with 8g of fat, 20g of carbohydrates, and 2g of protein. They are not suitable for low-sugar or keto diets. For those with dietary restrictions, the gluten-free and dairy-free adaptations offer alternatives, but they will still be high in sugar. I always balance these treats with a healthy meal beforehand. It’s all about moderation and enjoying the moment.
Conclusion
Making perfect black cat sugar cookies is more than just baking; it’s a ritual. It’s about embracing the mess, the repetition, and the joy of creating something beautiful and edible. I hope this recipe inspires you to get in the kitchen and experiment. Don’t be afraid to make mistakes. They’re part of the process. Customize the recipe to fit your tastes and preferences. Add your own twist and make it your own. I’d love to see your creations. Share your photos and stories in the comments below. Let’s celebrate the spooky season together. Happy baking!
Frequently Asked Questions
Why do my cookies spread too much?
This usually happens if the butter is too warm or if the dough isn’t chilled enough. Make sure your butter is softened but not melted, and chill the dough for at least 2 hours before baking. Also, ensure your oven is preheated to the correct temperature.
Can I use liquid food coloring instead of gel?
It’s not recommended. Liquid food coloring adds water to the dough and icing, which can cause the cookies to spread or the icing to run. Gel food coloring is more concentrated and doesn’t alter the consistency, giving you a deeper, more vibrant color.
How do I make the icing smooth?
Make sure your powdered sugar is sifted to remove lumps. Also, mix the icing slowly to avoid incorporating too much air. If the icing is too thick, add a drop of water. If it’s too thin, add more powdered sugar. Let it sit for a few minutes before piping to allow air bubbles to rise.
Can I freeze the dough?
Yes, you can freeze the dough for up to 3 months. Wrap it tightly in plastic wrap and then in foil. Thaw it in the refrigerator overnight before rolling and baking. This is a great way to prep ahead for parties.
What if I don’t have a cat-shaped cutter?
You can use a circle cutter for the body and a small triangle cutter for the ears. Assemble them on the baking sheet before baking. It takes a bit more time, but it’s a fun alternative. You can also freehand the shapes with a knife, but it’s harder to get uniform results.
Pin This Recipe!

Perfect Black Cat Sugar Cookies

These spooky yet sophisticated Halloween sugar cookies feature a buttery, chewy dough and intricate black cat decorations. They are easy to make, crowd-pleasing, and perfect for any festive occasion.
- Prep Time: 30 minutes
- Cook Time: 12 minutes
- Total Time: 2 hours 42 minutes
- Yield: 24 servings 1x
- Category: Dessert
- Cuisine: American
Ingredients
- 2 1/2 cups (315g) all-purpose flour, sifted
- 1 cup (226g) unsalted butter, softened to room temperature
- 1 cup (200g) granulated sugar
- 1/2 cup (100g) packed brown sugar
- 1 large egg, room temperature
- 2 teaspoons pure vanilla extract
- 1 teaspoon baking powder
- 1/2 teaspoon salt
- Black gel food coloring (e.g., Americolor Super Black)
- White icing or royal icing
- Yellow or green gel food coloring
- Black sprinkles or edible markers (optional)
Instructions
- Preheat oven to 350°F (175°C). Line two large baking sheets with parchment paper.
- In a medium bowl, whisk together the flour, baking powder, and salt. Set aside.
- In a large mixing bowl, cream together the softened butter, granulated sugar, and brown sugar until light and fluffy (about 3-4 minutes).
- Add the egg and vanilla extract, mixing until just combined. Scrape down the sides of the bowl.
- Gradually add the dry ingredients to the wet mixture on low speed until a dough forms.
- Divide the dough in half, flatten into discs, wrap in plastic wrap, and chill in the refrigerator for at least 2 hours (or up to 24 hours).
- Roll one disc of dough out to 1/4 inch thickness on a floured surface. Cut out cat shapes using a cookie cutter.
- Place cookies on prepared baking sheets, leaving 2 inches between each. Re-roll scraps to cut more cookies.
- Bake for 10-12 minutes until edges are barely golden but centers still look soft.
- Let cookies cool on the baking sheet for 5 minutes, then transfer to a wire rack to cool completely.
- Mix black gel food coloring into a portion of icing to create the cat body. Pipe to fill the shape.
- Tint remaining white icing with yellow or green gel coloring for pupils. Use a toothpick or fine tip to dot eyes.
- Add whiskers with white icing. Let icing dry completely before serving.
Notes
Chilling the dough is non-negotiable to prevent spreading. Use gel food coloring instead of liquid to maintain dough consistency. Ensure cookies are completely cool before icing to prevent melting. For gluten-free options, use a 1:1 gluten-free flour blend. For dairy-free, use vegan butter and a flax egg.
Nutrition
- Serving Size: 1 cookie
- Calories: 150
- Sugar: 14
- Sodium: 100
- Fat: 8
- Saturated Fat: 5
- Carbohydrates: 20
- Protein: 2
Keywords: Halloween cookies, black cat sugar cookies, easy Halloween treats, sugar cookie recipe, holiday baking, spooky desserts


